Harbor Freight Tools 68829 User Manual - Page 11
Tool Set Up - Blade Installation / Replacement, Workpiece and Work Area Set Up, General Operating
 |
View all Harbor Freight Tools 68829 manuals
Add to My Manuals
Save this manual to your list of manuals |
Page 11 highlights
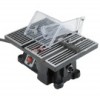
Tool Set Up - Blade Installation / Replacement Safety Setup Operation TO PREVENT SERIOUS INJURY FROM ACCIDENTAL OPERATION: Turn the Power Switch of the tool off and unplug the tool from its electrical outlet before adjusting tool or installing accessories. 1. Loosen the Table Knob and remove the Table. Blade 2. Use two wrenches (sold separately) to remove the Arbor Nut: one wrench to hold the Spindle Nut and another wrench to loosen the Arbor Nut. Arbor Nut Spindle Nut 3. Slide a Blade Shim onto the spindle, then a Blade (with the Blade's arrow matching the label's arrow), and the other Blade Shim. 4. Replace the Arbor nut and wrench tighten it securely. 5. WARNING! To prevent serious injury, replace the Table after service and secure firmly in place using the Table Knob. Figure B: Blade Installation Workpiece and Work Area Set Up 1. Designate a work area that is clean and well-lit. The work area must not allow access by children or pets to prevent distraction and injury. 2. Route the power cord along a safe route to reach the work area without creating a tripping hazard or exposing the power cord to possible damage. The power cord must reach the work area with enough extra length to allow free movement while working. 3. Secure loose workpieces using a vise or clamps (not included) to prevent movement while working. 4. There must not be objects, such as utility lines, nearby that will present a hazard while working. General Operating Instructions 1. Plug in the Power Cord. 2. Lift the Guard and slide the Straight Edge Guide out far enough to allow you to lay your workpiece flat on the Table. Lower the Guard onto your workpiece. Do not remove the Guard or attempt to operate this tool without either Guard in place. 3. Flip the Power Switch on. 4. Using the Straight Edge Guide to hold your workpiece steady, gently feed your workpiece toward the Blade. Keep your fingers away from the Blade at all times. WARNING! If the workpiece is small, use another small piece of wood or other material to push workpiece toward the Blade. Note: Do not push forcefully against the Blade, or use materials that are particularly difficult to cut. If the Blade slows down, you are pushing too forcefully, or the material is too hard or thick for this tool to cut. 5. To prevent accidents, turn off the tool and disconnect its power supply after use. Clean, then store the tool indoors out of children's reach. Item 68829 For technical questions, please call 1-800-444-3353. Page 11 Maintenance
-
 1
1 -
2
-
3
-
4
-
5
-
 6
6 -
 7
7 -
 8
8 -
 9
9 -
 10
10 -
 11
11 -
 12
12 -
 13
13 -
 14
14 -
 15
15 -
 16
16
 |
 |
