Harbor Freight Tools 68829 User Manual - Page 9
Mounting, Assembly - Guard Installation
 |
View all Harbor Freight Tools 68829 manuals
Add to My Manuals
Save this manual to your list of manuals |
Page 9 highlights
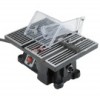
Safety Setup Setup - Before Use: Read the ENTIRE IMPORTANT SAFETY INFORMATION section at the beginning of this manual including all text under subheadings therein before set up or use of this product. TO PREVENT SERIOUS INJURY FROM ACCIDENTAL OPERATION: Turn the Power Switch of the tool off and unplug the tool from its electrical outlet before assembling or making any adjustments to the tool. Note: For additional information regarding the parts listed in the following pages, refer to Parts List and Diagram on page 14. Mounting Place your Table Saw on a flat, level surface capable of supporting weight of Table Saw and material being cut. Assembly - Guard Installation WARNING! Check guards for proper operation with saw disconnected from power before each use. Do not disable any guard. Do not operate saw if any movable guard does not move freely and close instantly. Make sure any movable guard does not touch the blade in all angles, depths of cut, and positions. 1. Remove the Screw (6) at the end of the Guard (4). Eye Guard Guard Screw 2. Align the hole in the center of the Eye Guard (5) with the hole in the Guard (4). 3. The hole in the Eye Guard (5) is countersunk to accommodate the Screw. Secure using the Screw (6), being careful not to overtighten. Screw 4. Swing the Guard Bracket (1) up and remove the top Screw (3). 5. Slide the Guard (4) over the Bracket, aligning the holes in the Guard with the hole in the Bracket. NOTE: Make sure that the Eye Guard is on the top side of the guard and that the rounded underside of the Guard rests over the blade. Guard Bracket Figure A: Guard Installation 6. Install the Screw (3) to secure the Guard in place. Operation Maintenance Item 68829 For technical questions, please call 1-800-444-3353. Page 9
-
 1
1 -
2
-
3
-
 4
4 -
 5
5 -
 6
6 -
 7
7 -
 8
8 -
 9
9 -
 10
10 -
 11
11 -
 12
12 -
 13
13 -
 14
14 -
15
-
16
 |
 |
