Harbor Freight Tools 69461 User Manual - Page 4
Tool Set Up, General Operating Instructions
 |
View all Harbor Freight Tools 69461 manuals
Add to My Manuals
Save this manual to your list of manuals |
Page 4 highlights
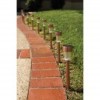
Operating Instructions Read the ENTIRE IMPORTANT SAFETY INFORMATION section at the beginning of this manual including all text under subheadings therein before set up or use of this product. Tool Set Up 1. Decide where you want to place the Solar Light Set. Choose a location that receives full, direct sunlight a minimum of eight hours a day. The location should not be near nighttime light sources such as porch lights or streetlights as this will cause the Solar Light Set to remain off. Note: During the day, the Solar Panel converts sunlight into electricity, recharging the battery. The amount of light the Solar Panel receives depends on placement of the Solar Light, geographic location and weather. If the weather is cloudy and the panels do not receive a full charge, the Solar Lights may not achieve the full hours of operating time. They will catch up after two to three days of full sun. 2. Make certain that the path of the Stake (4) is clear of lines, cables and conduits. 3. Remove the Stake (4) from the Solar Light Pole (3). 4. With a rubber mallet, gently tap the Stake into the ground. 5. Once the Stake is securely in the ground, slip the upper Solar Light assembly/Pole back onto the top of the Stake. General Operating Instructions 1. Unscrew the Lamp Housing from the Lamp Cover. 2. Slide the Power Switch to "AUTO". 3. Twist the Lamp Housing back on the Lamp Cover. 4. Repeat steps 1 - 3 for each Light. 5. After a full 8 hours of sunlight charging, the Lights will automatically turn ON during the night. After the initial charge is set, check to see that the Lights are on by viewing the them at night or in a dark location. If they are not lit, check the position of the "Auto" Switch and check that the Solar Panel has had full sunlight for 8 hours.
-
 1
1 -
 2
2 -
 3
3 -
 4
4 -
 5
5 -
 6
6 -
 7
7 -
 8
8
 |
 |
