Harman Kardon AVR 320 Owners Manual - Page 14
DTS Digital Mode Selector - remote control
 |
View all Harman Kardon AVR 320 manuals
Add to My Manuals
Save this manual to your list of manuals |
Page 14 highlights
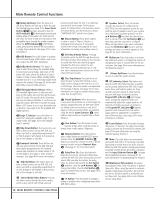
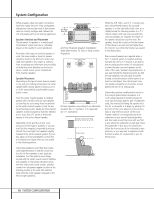
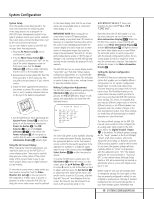
Main Remote Control Functions u Tuning Up/Down: When the tuner is in use, these buttons will tune up or down through the selected frequency band. If the Tuner Mode Button s^ has been pressed so that the AUTO Indicator X is illuminated, pressing and holding either of the buttons for three seconds will cause the tuner to seek the next station with acceptable signal strength for quality reception. When the AUTO Indicator X is NOT illuminated, pressing these buttons will tune stations in single-step increments. (See page 31 for more information.) v OSD Button: Press this button to activate the On-Screen Display (OSD) system used to set up or adjust the AVR 320's parameters. w Dolby Mode Selector: This button is used to select from among the available Dolby Surround processing modes. Each press of this button will select one of the Dolby Pro Logic II modes or Dolby 3 Stereo. When a Dolby Digital encoded source is in use, the Dolby Digital mode may also be selected. (See page 26 for the available Dolby surround mode options.) x DTS Digital Mode Selector: When a DTS-encoded digital source is selected, each press of this button will scroll thorugh the available DTS modes. The specific choice of modes will vary according to whether or not the source material contains DTS-ES 6.1 Discrete encoding. When a DTS source is not in use, this button has no function. (See page 40 for the available DTS Digital options.) y Logic 7 Selector: Press this button to select from among the available Logic 7 surround modes. (See page 26 for the available Logic 7 options.) z Skip Down Button: This button does not have a direct function on the AVR 320, but when used with a compatibly programmed CD or DVD changer it will change to the previous disc in the changer or carousel. ` Transport Controls: These buttons do not have any functions for the AVR 320, but they may be programmed for the forward/ reverse play operation of a wide variety of CD or DVD players, and audio or video cassette recorders. (See page 40 for more information.) 28 Skip Up Button: This button does not have a direct function on the AVR 320, but when used with a compatibly programmed CD or DVD changer it will change to the previous disc in the changer or carousel. 29 Stereo Mode Select Button: Pressing this button cycles through the stereo modes, and it is also used to turn off all surround processing and place the unit in a traditional two-channel Stereo mode. The first press selects 5-Channel Stereo, the next press selects 8-Channel Stereo, and the third press selects "SURROUND OFF," which is true Stereo. 30 Macro Buttons: Press these buttons to store or recall a "Macro", which is a preprogrammed sequence of commands stored in the remote. (See page 38 for more information on storing and recalling macros.) 31 DTS Neo:6 Mode Select: Pressing this button cycles the AVR through the various DTS Neo:6 modes, which extract a five-channel surround field from two-channel program material. The first press selects the last DTS Neo:6 surround mode that was in use, and each subsequent press selects one of the other DTS Neo:6 modes. 32 Disc Skip Button: This button has no direct function for the AVR 320 but is most often used to change to the next disc in a CD or DVD player when the remote is programmed for that type of device. (See page 37 for more information on using the remote with products other than the AVR 320.) 33 Preset Up/Down: When the tuner is in use, press these buttons to scroll through the stations programmed into the AVR 320's memory. When some source devices, such as CD players, VCRs and cassette decks, are selected using the device Input Selectors e, these buttons may function as Chapter Step or Track Advance. 34 Clear Button: Press this button to clear incorrect entries when using the remote to directly enter a radio station's frequency. 35 Memory Button: Press this button to enter a radio station into the AVR 320's preset memory. Once the MEMORY Indicator U flashes, you have five seconds to enter a preset memory location using the Numeric Keys r. (See page 31 for more information.) 36 Delay/Prev Ch.: Press this button to begin the process for setting the delay times used by the AVR 320 when processing surround sound. After pressing this button, the delay times are entered by pressing the Set Button p and then using the ⁄/¤ Buttons n to change the setting. Press the Set Button p again to complete the process. (See page 23 for more information.) 37 › Button: Press this button to change a setting or selection when configuring many of the AVR 320's settings. 14 MAIN REMOTE CONTROL FUNCTIONS 38 Speaker Select: Press this button to begin the process of configuring the AVR 320's bass management system for use with the type of speakers used in your system. Once the button has been pressed, use the ⁄/¤ Buttons n to select the channel you wish to set up. Press the Set Button p and then select another channel to configure. When all adjustments have been completed, press the Set Button p twice to exit the settings and return to normal operation. (See page 22 for more information.) 39 Multiroom: Press this button to activate the multiroom system or to begin the process of changing the input or volume level for the second zone. (See page 36 for more information on the Multiroom system.) 40 Volume Up/Down: Press these buttons to raise or lower the system volume. 41 SPL Indicator Select: This button activates the AVR 320's EzSet function to quickly and accurately calibrate the AVR 320's output levels. Press and hold the button for three seconds and then release it. Note that the test tone will begin circulating, and the Program/SPL Indicator c will change colors. During this sequence, EzSet will automatically adjust the output levels for all channels until they are equal, as shown by the Program/SPL Indicator c lighting green for each channel. Press this button again when the adjustment is complete to turn off the test tone. (See page 24 for more information on EzSet.) 42 Learn Button: Press this button to begin the process of "learning" the codes from another product's remote into the AVR 320's remote. (See page 37 for more information on using the remote's learning function.) 43 Mute: Press this button to momentarily silence the AVR 320 or TV set being controlled, depending on which device has been selected. When the AVR 320 remote is being programmed to operate another device, this button is pressed with the Input Selector Button e to begin the programming process. (See page 37 for more information on programming the remote.) 44 EzSet Sensor Microphone: The sensor microphone for the EzSet microphone is behind these slots. When using the remote to calibrate speaker output levels using EzSet, be sure that you do not hold the remote in a way that covers these slots. (See page 24 for more information on using EzSet.)
-
 1
1 -
2
-
3
-
4
-
5
-
6
-
7
-
8
-
 9
9 -
 10
10 -
 11
11 -
 12
12 -
 13
13 -
 14
14 -
 15
15 -
 16
16 -
 17
17 -
 18
18 -
 19
19 -
20
-
21
-
22
-
23
-
24
-
25
-
26
-
27
-
28
-
29
-
30
-
31
-
32
-
33
-
34
-
35
-
36
-
37
-
38
-
39
-
40
-
41
-
42
-
43
-
44
-
45
-
46
-
47
-
48
-
49
-
50
-
51
-
52
-
53
-
54
-
55
-
56
 |
 |
