Harman Kardon AVR 320 Owners Manual - Page 19
Using the On-Screen Display - power supply
 |
View all Harman Kardon AVR 320 manuals
Add to My Manuals
Save this manual to your list of manuals |
Page 19 highlights
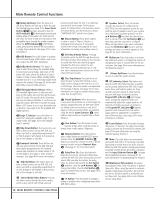
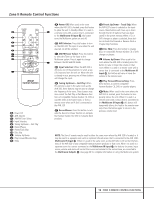
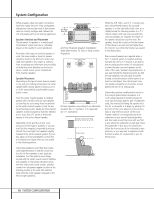
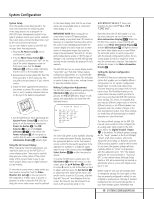
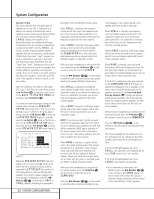
System Configuration System Setup Once the speakers have been placed in the room and connected, the remaining steps in the setup process are to program the AVR 320's bass management system for the type of speakers used in your system, calibrate the output levels, and set the delay times used by the surround-sound processor. You are now ready to power up the AVR 320 to begin these final adjustments. 1. Plug the AC Power Cord · into an unswitched AC outlet. 2. Press the Main Power Switch 1 in until it latches and the word "OFF" on the top of the switch disappears inside the front panel. Note that the Power Indicator 3 will turn amber, indicating that the unit is in the Standby mode. 3. Remove the protective plastic film from the front-panel lens. If left in place, the film may affect the performance of your remote control. 4. Install the three supplied AAA batteries in the remote as shown. Be certain to follow the (+) and (-) polarity indicators that are on the top of the battery compartment. 5. Turn the AVR 320 on either by pressing the System Power Control 2 on the front panel, or via the remote by pressing the Power On Button d, the AVR Selector f or any of the Input Selectors eg on the remote. The Power Indicator 3 will turn green to confirm that the unit is on, and the Main Information Display ˜ will also light. Using the On-Screen Display When making the following adjustments, you may find it easier to use the AVR 320's onscreen display system. These easy-to-read displays give you a clear picture of the current status of the unit and make it easy to see which speaker, delay, input or digital selection you are making. To view the on-screen menus, make certain you have made a connection from the Video Monitor Out Jack ¤ on the rear panel to the composite or S-Video input of your TV or projector. In order to view the AVR 320's displays, the correct video source must be selected on the video display. Note that the on-screen menus are not available when a component video display is in use. IMPORTANT NOTE: When viewing the onscreen menus using a CRT-based projector, plasma display or any direct-view CRT monitor or television, it is important that they not be left on the screen for an extended period of time. The constant display of a static image such as these menus or video game images may cause the image to be permanently "burned into" the projection tubes, plasma screen or CRT. This type of damage is not covered by the AVR 320 warranty and may not be covered by the projector/TV set's warranty. The AVR 320 has two on-screen display modes, "Semi-OSD" and "Full-OSD." When making configuration adjustments, it is recommended that the Full-OSD mode be used. This will place an option listing on the screen, making it easier to view the available options. Making Configuration Adjustments The full-OSD system is available by pressing the OSD Button v. When this button is pressed, the MASTER menu (Figure 1) will appear, and adjustments are made from the individual menus. * MASTER MENU * IN/OUT SETUP SURROUND SETUP SPEAKER SETUP DELAY ADJUST CHANNEL ADJUST MULTI-ROOM ADVANCED EXIT Figure 1 The semi-OSD system is also available, allowing you to make adjustments directly, by pressing the appropriate buttons on the front panel or remote control for the specific parameter to be adjusted. For example, to change the digital input for any of the sources, press the Digital Select Button Ûq on the front panel or remote. To use the full OSD menu system, press the OSD Button v. When the menu is on the screen, press the ⁄/¤ Buttons n until the on-screen › cursor is next to the item you wish to adjust, and then press the Set Button p to adjust that item. Note that the menus will remain on the screen for 20 seconds, and then they will "time-out" and disappear from the screen. The time-out may be increased to as much as 50 seconds by going to the ADVANCED SELECT menu, and changing the item titled FULL OSD TIME OUT. Note that when the full OSD system is in use, the menu selections are not shown in the Main Information Display ˜Y. When the full OSD menu system is used, OSD ON will appear in the Main Information Display Y and the OSD Indicator P will light to remind you that a video display must be used. When the semi-OSD system is used in conjunction with the discrete configuration buttons, the onscreen display will show a single line of text with the current menu selection. That selection will also be shown in the Main Information Display Y. Setting the System Configuration Memory The AVR 320 features an advanced memory system that enables you to establish different configurations for the speaker configuration, digital input, surround mode, delay times, crossover frequency and output levels for each input source. This flexibility enables you to custom-tailor the way in which you listen to each source and have the AVR 320 memorize those settings. This means, for example, that you may use different output levels or trims for different sources, or set different speaker configurations with the resultant changes to the bass management system. Once these settings are made, they will automatically be recalled whenever you select that input. The factory default settings for the AVR 320 have all inputs except for DVD configured for an analog audio input except for the DVD input, where the Digital Coaxial 1 Input 32 is the default. The default speaker settings are for "Large" speakers at the front left/right, "Small" at all other positions, and for the Subwoofer set as being on. However, once the DSP processing system is used for the first time for any input, the speaker settings will automatically default to "Small" at all positions with the subwoofer set to "LFE." The default setting for the surround modes is "Surround Off," or two-channel stereo, although Dolby Digital or DTS will automatically be selected as appropriate when a source with digital encoding is in use. Before using the unit, you will probably want to change the settings for most inputs so that they are properly configured to reflect the use of digital or analog inputs, the type of speakers installed and the surround mode specifics of your home theater system. Remember that 19 SYSTEM CONFIGURATION
-
 1
1 -
2
-
3
-
4
-
5
-
6
-
7
-
8
-
9
-
10
-
11
-
12
-
13
-
 14
14 -
 15
15 -
 16
16 -
 17
17 -
 18
18 -
 19
19 -
 20
20 -
 21
21 -
 22
22 -
 23
23 -
 24
24 -
25
-
26
-
27
-
28
-
29
-
30
-
31
-
32
-
33
-
34
-
35
-
36
-
37
-
38
-
39
-
40
-
41
-
42
-
43
-
44
-
45
-
46
-
47
-
48
-
49
-
50
-
51
-
52
-
53
-
54
-
55
-
56
 |
 |
