Harman Kardon AVR 520 Owners Manual - Page 21
Set Button, Buttons, Button, Night Button, Main Information, Display, DTS-ES Mode, Indicator
 |
View all Harman Kardon AVR 520 manuals
Add to My Manuals
Save this manual to your list of manuals |
Page 21 highlights
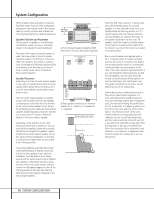
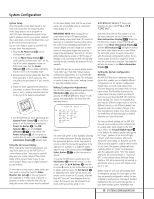
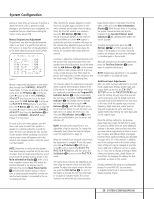
System Configuration Making this selection will set the surround mode options for the AVR so that only the correct modes for the number of speakers in your specific system will be available. Should you change your system and add additional speakers at a later date, it is important to change this setting so that advanced surround modes such as Logic 7/7.1 and DTS-ES 6.1 Discrete and Matrix will be available. When the desired selection is made, press the Set Button p to continue with the setup and configuration. Once the setting is made for 5.1 or 6.1/7.1 operation, the default surround mode for an input should be set. Each of the remaining five lines on the menu (Figure 3) contains the various surround mode categories, and within those menus you may choose one of the submodes. Note that the list of specific sub-modes in some categories will vary according to whether 5.1 or 6.1/7.1 operation is chosen. In addition, some of the modes available in the AVR 520 will not appear unless a digital source is selected and playing the correct bitstream. To select the mode that will be used as the initial default for an input, first press the ⁄/¤ Buttons n until the on-screen cursor is next to the desired mode's master category name. Next, press the Set Button p to view the sub-menu. Press the ‹/› Buttons o 37 to scroll through the available choices, and then press the ¤ Button n so that the cursor is next to BACK TO MASTER MENU to continue the setup process. On the Dolby menu (Figure 4), the selection choices include Dolby Digital, Dolby Pro Logic II Music, Dolby Pro Logic II Cinema, Dolby Pro Logic II Emulation and Dolby 3 Stereo. A complete explanation of these modes is found on Page 26. Note that when the Dolby Digital mode is selected there are additional settings available for the Night mode. ** DOLBY ** MODE: DOLBY DIGITAL NIGHT: OFF MID MAX BACK TO MASTER MENU Figure 4 The Night mode is a feature of Dolby Digital that uses special processing to preserve the dynamic range and full intelligibility of a movie sound track while reducing the peak level. This prevents abruptly loud transitions from disturbing others, without reducing the sonic impact of a digital source. Note that the Night mode is only available when specially encoded Dolby Digital signals are played. To adjust the Night mode setting for an input from the menu, make certain that the › cursor is on the NIGHT line of the DOLBY menu. Next, press ‹/› Buttons o 37 to choose between the following settings, as they appear in the on-screen display: OFF: When OFF is highlighted, the Night mode will not function. MID: When MID is highlighted, a mild compression will be applied. MAX: When MAX is highlighted, a more severe compression algorithm will be applied. We recommend that you select the MID setting as a starting point and change to the MAX setting later, if desired. Note that the Night mode may be adjusted directly any time that a Dolby Digital source is playing by pressing the Night Button l. When the button is pressed, the phrase D-RANGE will appear in the lower third of the video screen and in the Main Information Display Y. Press the ⁄/¤ Button n within three seconds to select the desired setting. When all settings for the surround setup have been made, press the ⁄/¤ Buttons n so that the › cursor is next to BACK TO MASTER MENU, and press the Set Button p to return to the Master menu. On the DTS menu, the selection choices made with the ‹/› Buttons o 37 on the remote are determined by a combination of the type of DTS program material in use and whether the 5.1 or 6.1/7.1 speaker output configuration is in use. When either of the speaker configurations is in use, you may select either the Neo:6 Music or Neo:6 Cinema mode when an analog source is playing to deliver an enhanced 5.1channel sound field. When the 5.1 configuration is in use the AVR will automatically select the 5.1 version of DTS processing when a DTS data stream is selected. When the 6.1/7.1 mode is selected, the DTS-ES Discrete mode will automatically be activated when a DTS source with the ES Discrete "flag" is in use. In these cases the DTS-ES Mode Indicator D will light. When a non-ES DTS disc is in use, you may select the DTS-ES Matrix mode through this menu to create a full eightspeaker surround mode. See page 26 for a complete explanation of the DTS modes. On the Logic 7 menu, the selection choices made with the ‹/› Buttons o 37 on the remote are determined by whether the 5.1 or 6.1/7.1 speaker output configuration is in use. In either case, the selection of a Logic 7 mode enables Harman Kardon's exclusive Logic 7 processing to create fully enveloping, multichannel surround from either two-channel Stereo or Matrix-encoded programming such as VHS cassettes, laser discs or television broadcasts produced with Dolby surround. In the 5.1 configuration you may select the Logic 7/5.1 Music, Cinema or Enhanced modes. They work best with two-channel music, surround-encoded programs or standard twochannel programming of any type, respectively. When the 6.1/7.1 mode is selected, only the Music and Cinema modes are available, and the output will be in a full eight-channel sound field. Note that the Logic 7 modes are not available when either Dolby Digital or DTS Digital soundtracks are in use. See pages 26 and 27 for a complete explanation of the DSP Surround modes. On the DSP (SURR) menu, the selection choices made with the ‹/› Buttons o 37 on the remote select from one of the DSP surround modes that are designed for use with two-channel stereo programs to create a variety of sound field presentations. The choices available are Hall 1, Hall 2, Theater, VMAx Near and VMAx Far. The Hall and Theater modes are designed for multichannel installations, while the two VMAx modes are optimized for use in delivering a full surround field when only the front left and front right speakers are installed. See pages 26 and 27 for a complete explanation of the DSP surround modes. On the STEREO menu, the selection choices made with the ‹/› Buttons o 37 on the remote may either turn the surround processing off for a traditional two-channel stereo presentation, or select 5 Stereo or 7 Stereo depending on whether the 5.1 or 6.1/7.1 output is in use. The latter modes feed a two-chan- 21 SYSTEM CONFIGURATION
-
 1
1 -
2
-
3
-
4
-
5
-
6
-
7
-
8
-
9
-
10
-
11
-
12
-
13
-
14
-
15
-
 16
16 -
 17
17 -
 18
18 -
 19
19 -
 20
20 -
 21
21 -
 22
22 -
 23
23 -
 24
24 -
 25
25 -
 26
26 -
27
-
28
-
29
-
30
-
31
-
32
-
33
-
34
-
35
-
36
-
37
-
38
-
39
-
40
-
41
-
42
-
43
-
44
-
45
-
46
-
47
-
48
-
49
-
50
-
51
-
52
-
53
-
54
-
55
-
56
 |
 |
