Harman Kardon AVR25MKII Owners Manual - Page 7
Fm/am, Selector, Station, Preset, Buttons, Monitor, Button, Input, Function
 |
View all Harman Kardon AVR25MKII manuals
Add to My Manuals
Save this manual to your list of manuals |
Page 7 highlights
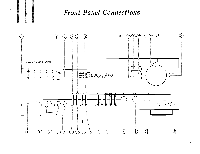
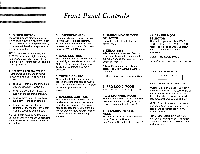
II III • • • 111 II 20. FM/AM BAND SELECTOR Press these buttons to select the FM or AM radio band. When you select the AM or FM radio band, the receiver displays the last frequency selected on that band. 21. STATION PRESET BUTTONS Select one of 30 preset locations to recall the station stored in memory. The input function is automatically changed to TUNER when the button is pressed. When you select numbers from 10 through 29, you must select the second digit within about 2 seconds. To select preset 30, simply press "0". 22. TAPE 2 MONITOR BUTTON Set TAPE 2 MONITOR to the "off" position when you want to hear the other input functions. Press this button to monitor the cassette deck connected to the TAPE 2 MON input jacks. 23. INPUT FUNCTION SELECTOR Press the button to select the desired input function: VCR 1, VCR 2, VDP, TAPE 1, TV/Aux, Tuner, CD or Phono. To dub from VCR 2 to VCR 1, press the VCR 2 button and then press the VCR 1 REC button. For the input function of VCR 1 press the VCR 2 button and VCR1 DUBBING button. Set the recording VCR (VCR 1) to recording mode. Set the playback VCR (VCR 2) to play a tape. Dubbing will start. ■ To hear another input source during video tape dubbing: Press the input function you want to hear, and play the input source. NOTE: If you press the TEST TONE button during VCR 1 DUBBING, the audio signal is not recorded. 24. VCR 2 SELECTOR Push in this button to select the VCR 2 jacks on the front, rather than the VCR 2 jacks on the rear. 25. VCR 2/CAMCORDER INPUT JACKS VIDEO IN: Connect to the VIDEO OUTPUT jack of a VCR (yellow jack). AUDIO IN: Connect to the AUDIO OUTPUT jacks of a VCR (red and white jacks). 26. LOUDNESS BUTTON Press this button to compensate for the response of the human ear at low listening levels (known as the FletcherMunson hearing curve). The high and low frequencies are automatically boosted when this button is pushed in. In the OFF position, the frequency response is flat at all volume levels. This button does not work at high volume levels. 27. VOLUME CONTROL Turn the VOLUME clockwise to increase the volume and counterclockwise to decrease it. The volume of the front, center, and rear channels is changed at the same time. 28. VOLUME LEVEL INDICATOR This indicator moves in accordance with the volume level. The indicator blinks when the mute button on the remote commander is pressed. 29. DISPLAY WINDOW This window shows the state of operation for easier control of the receiver. It also contains the IR Remote Sensor. 6
-
 1
1 -
 2
2 -
 3
3 -
 4
4 -
 5
5 -
 6
6 -
 7
7 -
 8
8 -
 9
9 -
 10
10 -
 11
11 -
 12
12 -
13
-
14
-
15
-
16
-
17
-
18
-
19
-
20
 |
 |
