Harman Kardon DP 1US Owners Manual - Page 10
Initial Setup continued - manual
 |
View all Harman Kardon DP 1US manuals
Add to My Manuals
Save this manual to your list of manuals |
Page 10 highlights
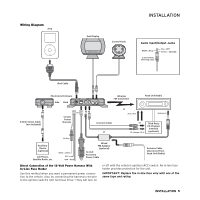
Initial Setup (continued) Setting AUX Input To route an audio signal from a device (e.g., cell phone or satellite radio; see Wiring Diagram on page 5) connected to Drive + Play's auxiliary input to your mobile audio system: • To enable or disable automatic sensing and switching of audio signals on Drive + Play's auxiliary input: Drive + Play Menu > Settings > select Auto audio sense check box to enable or to disable (default) it. • To select Auxiliary input signals manually with iPod connected: 1. Drive + Play Menu > Settings > AUX input. 2. Go Back (on) will appear. • To restore audio from the iPod manually with iPod connected: 1. Drive + Play Menu > Settings > Go Back (on). 2. Audio from the iPod will be restored, and the Settings Menu will appear. • To enable/disable AUX input manually, when no iPod is connected: 1. Turn on the Drive + Play. Aux is Disabled is highlighted. 2. Press (center) Select button once to enable AUX input. Listening to AUX message will appear. 3. Press Select button again to disable AUX input. Aux is Disabled message will appear. Setting the Display You can customize Drive + Play to display your viewing preferences as follows: • To enable or disable Large Fonts: 1. Drive + Play Menu > Settings > Display Settings > select Large Font check box to turn it on or off (default). 2. To enable or disable Large Fonts, press the (top) Menu button twice to return to the Drive + Play menu. NOTE: When Large Fonts is disabled (unchecked), the Now Playing screen can display up to 32 characters. When Large Fonts is enabled (checked), the first 16 characters will be displayed and you can press the (center) Select button to display the next 16 characters and again to display the first 16, or use Auto Scroll (see next item). • When Large Fonts are enabled, you can also enable or disable Auto Scroll, which automatically scrolls a text message longer than 16 characters in the Now Playing screen: Drive + Play Menu > Settings > Display Settings > Auto Scroll > select On or Off (default). • To adjust the display's contrast: 1. Drive + Play Menu > Settings > Display Settings > Adjust Contrast. 2. The Contrast graphic display will appear. Scroll to select a desired contrast. • To adjust the display's backlight: 1. Drive + Play Menu > Settings > Display Settings > Adjust Backlight. 2. The Brightness graphic display will appear. Scroll to select a desired brightness. • You can set Drive + Play's backlight to turn off after 10 seconds. When it is off, pressing any button on the Control Knob will turn it back on. To turn the display's backlight timer on or off: Drive + Play Menu > Settings > Display Settings > Backlight Timer > select On (default is always on) or 10 sec. • To enable or disable an inverted display (i.e., white text on black background): Drive + Play Menu > Settings > select Display Settings check box to enable or disable (default) it. Setting the Drive + Play (Main) Menu You can set the Drive + Play (Main) Menu to display your choice of menus as follows: NOTE: As a default, the following eight menus will be displayed (denoted by checked boxes): FM Settings, Now Playing, Playlists, Artists, Albums, Songs, Genres and Composers. If you want all these selections to display, then skip this section. 1. Drive + Play Menu > Settings > Change Main Menu. 2. Scroll to a selection (e.g., Composers) you want to remove and press the (center) Select Button once to uncheck the box. To add the menu again, press the (center) Select Button once to check the box. 3. Repeat step 2 for other menus you want to remove from or add to the Main Menu. 10 OPERATION
-
 1
1 -
2
-
3
-
4
-
 5
5 -
 6
6 -
 7
7 -
 8
8 -
 9
9 -
 10
10 -
 11
11 -
 12
12
 |
 |
