Harman Kardon DP 1US Owners Manual - Page 8
Operating Drive + Play - drive and play
 |
View all Harman Kardon DP 1US manuals
Add to My Manuals
Save this manual to your list of manuals |
Page 8 highlights
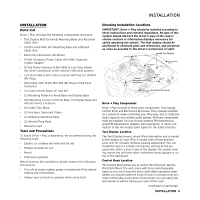
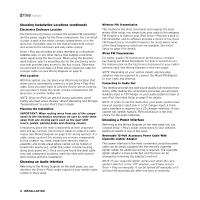
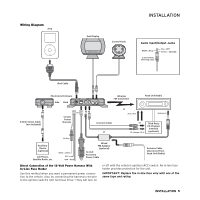
Installing Components Installing the Control Knob (continued) 2. At the base (below the cable), using the 1.5mm hex key, loosen (but do not remove) the hex setscrew. 3. To install the Control Knob with adhesive tape, perform the following steps or skip to step 4: a. Insert the mounting plate, rotate it 180°, and tighten the hex setscrew. Control Knob With 0° Base Arrow Control Knob With 0° Base Mounting Plate Mounting Plate Adhesive Pad b. At the site, wipe the surface and exposed mounting plate with one of the enclosed alcohol pads. Allow both to dry. c. Remove the protective tape from one side of one of the enclosed adhesive pads, and press the pad against the mounting plate. d. Remove the remaining protective tape, and press and hold the Control Knob to its site for 5 seconds. 4. To install the Control Knob with mounting screws, perform the following steps: a. At the proposed site, place the mounting plate and rotate it so that the arrow will point toward the hex set-screw at the back of the base after it's mounted. b. Holding the mounting plate in position, fasten it to the surface with three enclosed mounting screws. c. Using the mounting plate's center hole as a template, drill a hole through the mounting surface and pass the Control Knob's cable through the hole. d. Place the Control Knob on the mounting plate (180° from its final position), and then rotate it a half-turn to the final position. Tighten the hex setscrew at the back of the base. 8 INSTALLATION/OPERATION 5. Route the attached cable to the Electronics Enclosure. Installing the iPod Cable Route the iPod dock connector cable to the chosen iPod site (e.g., the center console compartment or the glove box). Be sure to leave enough cable exposed to make connecting and disconnecting the iPod easy. Making the System Connections With all power off, refer to the Wiring Diagram on page 5 and make only the power, ground and audio signal connections that apply to the scheme you have chosen. After verifying all connections including the iPod, proceed to the next section, Operating Drive + Play. OPERATING DRIVE + PLAY Distraction Warning Do not connect or disconnect your iPod or program Drive + Play while driving. Always pull off the road and park in a position that you are absolutely sure presents no risk before browsing your iPod or adjusting the settings on your Drive + Play. Always obey all traffic laws while driving. Overview Scroll Ring Scroll Left Once to Last Menu Item Scroll Left and Hold to Jump Back In Now Playing, Scroll Left to Fast Rewind Menu Press Once to Jump to Last Screen Scroll Ring Scroll Right Once to Next Menu Item Scroll Right and Hold to Jump Forward In Now Playing, Scroll Right to Fast Forward Previous/Rewind Press Once to Play Last Track Next/Fast Forward Press Once to Play Next Track Select Press Once to Choose Play/Pause Highlighted Menu Item Press Once to Stop or Resume Play of Current Track
-
 1
1 -
2
-
 3
3 -
 4
4 -
 5
5 -
 6
6 -
 7
7 -
 8
8 -
 9
9 -
 10
10 -
 11
11 -
 12
12
 |
 |
