Harman Kardon HD7500 Owners Manual - Page 4
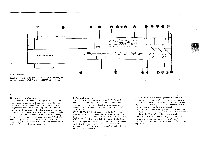
HD7500/HD7600, Front, Panel, Controls
 |
View all Harman Kardon HD7500 manuals
Add to My Manuals
Save this manual to your list of manuals |
Page 4 highlights
HD7500/HD7600 Front Panel Controls POWER switch The POWER switch turns the unit on and off ® Compact disc drawer Load a disc (hill-size or 8 cm/3-inch) into your compact disc player by placing it in this drawer with the label side up. Open and close the drawer using the OPEN/CLOSE button (3). 0 OPEN/CLOSE button Press this button to open or close the compact disc drawer. The drawer will also close if you press the play button or. push the drawer gently toward the chassis of the player; however, we recommend that you do not push the drawer. REMOTE SENSOR This area receives the signal from the remote control unit. Make sure this area of the front panel is kept free from dirt or other obstructions that might prevent proper reception of the infrared signal from the remote control. 0 FUNCTION indicator DISC - This indicator lights when the disc drawer is open, and when a disc is loaded. It does not light when there is no dice. REPEAT - When this indicator is lit, the unit is in REPEAT mode and will continuously repeat either the entire disc or the programmed sequence. A-B - When this indicator is lit steadily, the unit is set to repeat a specified section of the disc (from A to B). When REPEAT indicator is lit, you have already programmed the starting point (point A) of a section, and the unit is waiting for you to program the ending point of the section (point B). INTRO - When this indicator is lit, the unit is in INTRO SCAN mode and will play only the first 15 seconds of each selection on the disc or in the selected program. PROG - When this indicator is lit, the unit is in PROGRAM mode, in which you can program a sequence of tracks in the order you'd like to hear them, then play back your programmed sequence. SPACE - When this indicator is lit, the unit is in SPACE mode and will insert 4 seconds of space between tracks. el PLAYBACK mode PLAY - This indicator is lit when the unit is playing a track. PAUSE - This indicator is lit when the unit is PAUSE mode (i.e., you have pressed PAUSE to temporarily stop playback). 0 TRACK indicator When a disc is loaded but not playing, the TRACK indicator displays the total number of tracks on that disc. During playback, the indicator displays the number of the track currently being played. During programming, it displays the number of the track most recently selected. 3 INDEX indicator Some discs that contain very long track may have those tracks subdivided into shorter sections. For example, a long classical piece may be divided into movements, each of which may have an index number. The INDEX indicator displays the number of the subdivision of a track currently being played. If the track has no subdivisions, the INDEX indicator will display a-1 during playback. During programming, the INDEX light goes out and the indicator displays the total number of tracks selected in the programmed sequence. 0 TIME indicator When a disc is loaded but not playing, the TIME indicator displays the total amount of playback time on that disc. During playback, depending on the state of the TIME button (11), the indicator displays one of the following • The time that has elapsed since the beginning of the current track. • The time that remains on the currently selected track. The words REMAIN SINGLE will be displayed if the indicator is in this mode. • The time that remains on either the entire disc or on the programmed selections. The words REMAIN TOTAL will be displayed if the indicator is in this mode. Note that if you have programmed more than 99 minutes in your selection, only dashes will appear in this mode. DISPLAY button This button turns the display on and off. When you turn the display off in PLAY mode, the entire display goes off. In PAUSE mode, most of the display goes off, but the track number is still displayed. In STOP mode, most of the display goes off, but the total number of tracks on the disc is still displayed. In some systems, turning the fluorescent display off may provide the purest possible sound quality during playback. (8 TIME button During playback or programming, the button cycles through the three TIME display modes • The time that has elapsed since the beginning of the current track. o The time that remains on the currently selected track. • The time that remains on either the entire disc or the programmed sequence. ® REPEAT button This button puts your compact disc player in and out of REPEAT mode. In REPEAT mode, the unit will continually play back either the entire disc or the programmed sequence of tracks. Press the button once to turn on REPEAT mode; press again to turn off REPEAT mode. When the unit is in REPEAT mode, the FUNCTION indicator (5) will display the word REPEAT. ® CLEAR button The CLEAR button removes tracks from your programmed sequence one by one starting with the last track entered. Each time you clear a track from the programmed sequence, that track's time is deleted from the total time displayed. This button is used only in PROGRAM mode. 69 CHECK button When a disc is loaded but not playing (STOP mode), you can press the CHECK button to see the playback time of each track on the disc. Each time you press the CHECK button, the next track is displayed along with its playback time. When you.have stepped sequentially through all the tracks on the disc, another press of the CHECK button displays the total playback time of the entire disc. In PROGRAM mode, the CHECK button displays the cumulative time of the tracks in the programmed sequence. That is, the first press displays the time of the first programmed track, the second press displays the cumulative playback time of the fi rst and second tracks, and so on. ® PROGRAM button This button puts your compact disc player in and out of PROGRAM mode. Press the button once to turn on PROGRAM mode; press again to turn it off In PROGRAM mode, you can program a set of tracks to play in any sequence. (For instructions on programming a sequence of tracks, see the Operations section of this manual.) When the unit is in PROGRAM mode, the FUNCTION indicator (5) will display the word PROG in red. HEADPHONES jack Stereo headphones with a standard 6.5 mm (1/4") plug can be connected to this jack. DIGITAL OUT button This button switches the digital output jacks on and off. Press the button to turn these outputs on only when using the optina] digital output connections. 0 OUTPUT LEVEL control This knob controls the volume of the variable output jacks on the rear panel as well as the headphone volume. You can use this output volume control to match the volume of your compact disc player with the volume of your turntable or tuner. In systeMs where the compact disc player is connected directly to the power amplifier, the OUTPUT LEVEL control provides the voluthe control for the system.
-
 1
1 -
 2
2 -
 3
3 -
 4
4 -
 5
5 -
 6
6 -
 7
7 -
 8
8 -
 9
9 -
 10
10 -
11
-
12
 |
 |
