Harman Kardon HK705 Owners Manual - Page 7
your cassette
 |
View all Harman Kardon HK705 manuals
Add to My Manuals
Save this manual to your list of manuals |
Page 7 highlights
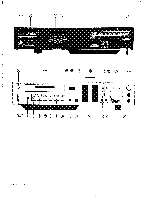
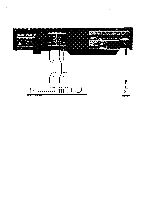
To skip passages or to wind the cassette to its end, press the STOP lever (14), then the FAST FORWARD lever (15) and allow the tape to wind forward to the appropriate point. Again, make sure you press the STOP lever (14) before the PLAY lever (12). To remove your cassette from the cassette deck, press the STOP lever (14), then the EJECT button (8). The CASSETTE DRAWER (13) will automatically open and you may remove the cassette. To record cassette tapes. Before recording any tape, it's important to understand the function of the RECORD LEVEL control (28) and the PEAK LEVEL display (22). When recording any material to any tape, the RECORD LEVEL control (28) should always be adjusted as high as possible without the PEAK LEVEL display (22) indicating more than 0 dB on the scale. When recording with the DOLBY HX process, the RECORD LEVEL control (28) may be adjusted so that the PEAK LEVEL display (22) indicates a maximum of +3 on the scale. To record a cassette, set the function switch of your preamplifier or receiver to the program source you wish to tape from. Load a blank cassette as described above, making sure the cassette is rewound to its beginning. To record, press the PLAY lever (12) and the RECORD lever (10) simultaneously. The RECORD indicator (23) will light any time the cassette is in the record mode. During recording, there may be passages in your program source you wish to omit from your tape. To edit these pages out, press the PAUSE lever (16) to stop the recording process, then, when you wish to continue recording, press the PAUSE lever (16) again. Pressing the RECORD MUTE pushbutton (9) during recording will defeat the program source, but allow the deck to continue recording a blank signal. Live recording. The front panel MIC jacks (29) accept low impedance microphones (600 ohms or less) for live recording. For recording with microphones, plug the microphones into the MIC jacks (29) and adjust the record level control as described above. Record tabs The plastic case on every blank cassette fea- tures record tabs. These are found on the TOP LEFT side of the cassette when you hold the cassette with the exposed portion of tape facing down and the appropriate side facing you. To preserve a recording from accidental erasure, break off the appropriate record tab with a small screwdriver. To re-record over a cassette where the tabs have been removed, cover the appropriate tab hole with a piece of adhesive tape. To erase recorded material. Recording new material automatically erases previous material. To erase a cassette without recording new material, remove any microphones attached to the MIC jacks (29) and set the RECORD LEVEL control (28) to "0". Then follow the instructions for recording using no program source. 1••• Y. 10 Cleaning capstan and heads. The capstan and heads on your cassette deck should be cleaned after every 100 hours of use to prevent the accumulation of dirt and other materials that could interfere with recording and playback quality. To clean the heads and capstan, first turn the unit off. Press the EJECT button (8) and allow the CASSETTE DRAWER (13) to open. Remove the TAPE HEAD CLEANING door and clean the heads and capstan as shown in the illustration, using a cotton swab and head cleaning fluid. 8
-
 1
1 -
 2
2 -
 3
3 -
 4
4 -
 5
5 -
 6
6 -
 7
7 -
 8
8
 |
 |
