Harman Kardon HK720 Owners Manual - Page 4
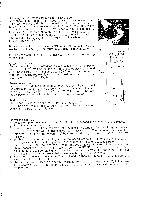
Fig.4, White, Green, Washers, Stylus, Mounting, Screws, Headshell, Wires, Clips, Cartridge, Fig.6,
 |
View all Harman Kardon HK720 manuals
Add to My Manuals
Save this manual to your list of manuals |
Page 4 highlights
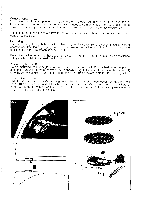
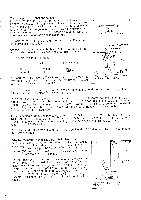
Connecting the Headshell and cartridge Release the tonearm clamp (16) to free the tonearm (15). Remove the headshell (13) plugged in the end of the tonearm (15) by loosening the black thumbscrew (14) at the end of the tonearm (15). A cartridge is not supplied with this turntable so that you have complete choice of cartridge brand and type. Be sure to use a cartridge weighing 2 to 8 grams. Unpack the cartridge and carefully remove stylus. Place them carefully at a safe location. Connect the signal wires of the headshell (13) correctly to the appropriate terminals of your cartridge according to Fig. 4. The signal wires are color coded: Left channel Right channel Signal Ground WHITE BLUE RED GREEN The cartridge may have a different color code or other marking system to identify its terminals. Consult the instructions supplied with your cartridge for this information. Fig.4 WHITE BLUE RED GREEN WASHERS- / MOUNTING SCREWS HEADSHELL LEAD WIRES STYLUS TEAM INAL CLIPS CARTRIDGE - - NUTS When you have connected signal wires, install cartridge to the head shell as shown in Fig.4. Do not fully tighten screws. Replace stylus in the cartridge. Insert the headshell with the cartridge fully into the end of the tonearm (15) and tighten the black thumbscrew (14). With a record on the turntable mat, place the cartridge on the record. See that the tonearm is parallel with the record. If it is extremely slanted, place shim(s) between the headshell and cartridge to make the tonearm parallel with the record. Tighten two screws with a small flat screwdriver after the adjustment. If the specified cartridge capacitance is less than 300pF, place the CAP TRIM knob (4) at the NORMAL position. Place it at + 100pF position for 300 to 400pF, or at + 200pF position for over 400pF. Be sure to minimize the volume setting of your amplifier during this adjustment. Use a coin to turn the CAP TRIM knob (4). Since the headshell offset angle in the hk720 is designed at 25.5 degrees, always use a Harman Kardon's headshell. Adjusting the stylus overhang and headshell offset angle With the turntable mat (12) on the platter (11), place the tracking Fig.6 angle gauge on the platter. The hole goes over the center spindle (18). Fold up flap of the gauge. Lift the tonearm (15) from the rest (16) (with the cue lever (17) in the down position) and move it toward the center of the platter (11). Carefully position the headshell and cartridge assembly on the center spindle (18). Adjust the cartridge position so that the stylus tip is at the nearest edge of flap. (See Fig.5.) Then turn gauge and adjust cartridge position so that the stylus tip is over the indicated center point and cartridge edges are parallel with reference lines on the gauge. (See Fig.6.) Since this gauge is especially designed for the hk720, do not use it on other turntables. CENTER SPINDLE Fig.5 STYLUS FLAP FLAP TRACKING ANGLE GAUGE 3
-
 1
1 -
 2
2 -
 3
3 -
 4
4 -
 5
5 -
 6
6
 |
 |
