Harman Kardon HK720 Owners Manual - Page 5
amplifier.
 |
View all Harman Kardon HK720 manuals
Add to My Manuals
Save this manual to your list of manuals |
Page 5 highlights
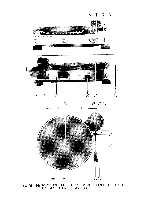
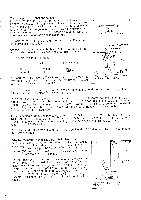
Balancing the tonearm and adjusting the tracking force After checking the tonearm (15) moves freely (with the cue lever (17) in the down position), slide the counterweight (19) onto the rear of the tonearm (15), set the antiskating control (21) to the zero "0" position and gently move the counterweight (19) forward with rotation until the tonerm (15) floats parallel to the platter. Then while keeping the counterweight (19) stationary, rotate only the counterweight scale ring (20) so that its gradation zero "0" aligns with the white line on the tonearm shaft. (See Fig. 7.) Rotate the counterweight assembly (19), (20) until the scale ring (20) reading indicates the stylus pressure specified by the manufacturer. Set the antiskating control (21) normally to the same as the tracking force setting. Output connections Before connecting to your amplifier, make sure that the amplifier power has been switched off. Connect the two output cables plus ground lead (7) to the PHONO INPUT connectors and GND terminal on the rear of your amplifier. The red plug is the right channel output, and the white plug the left channel. (See Fig. 8.) Power connection Connect the hk720 power line cord (8) to an AC outlet. If you connect the cord to an AC convenience outlet on the rear of your amplifier, you may prefer a SWITCHED outlet. With a SWITCHED outlet, the turntable's power will be controlled by the amplifier's power switch. Positioning the turntable The hk720 should be placed on a firm, level surface. The location should be clean, away from direct sunlight and other heat sources, well ventilated and free from any vibration. 7 Fig .8 AC Outlet 0 0 "iaolgitaN SCALE RING WHITE LINE L• ER DOWN PHONO GND INPUT WHITE L RED Amplifier Operating the hk720 1. Switch the speed selector (1) to either 33-1/3 or 45rpm, depending on the record to be played. 2. Place the record on the platter. 3. Free the tonearm (15) from the arm clamp (16) and lift the tonearm (15) by raising the cue lever (17). Hold the tonearm with hand and move it to the desired track. The platter will start to rotate at this time. Then lower the tonearm (15) by carefully returning the cue lever (17) to its former position. 4. To check that the record is rotating at a correct speed, observe the corresponding stroboscope markings around the rim of the platter. Depending on the selected speed (33-1/3 or 45rpm) and the frequency of AC power source for your area (50 or 60Hz), the relevant stroboscope level should appear to be stationary. If it does not, adjust the SPEED control (2) until it does (in which case, the record wil l be rotating at exactly the correct speed). When the cue lever (17) is used, this adjustment can be completed before lowering the stylus onto the record. 5. At the end of the record the tonearm (15) wil l lift and return to the arm rest (16) automatically, and the power is then switched off. 6. Record play may be stopped at any time by simply pressing the CUT push-button (3). In this case, the tonearm (15) will lift and return to the arm rest (16) automatically, and the power is also switched off. 4
-
 1
1 -
 2
2 -
 3
3 -
 4
4 -
 5
5 -
 6
6
 |
 |
