Harman Kardon HK750 Owners Manual - Page 6
Source/copy
 |
View all Harman Kardon HK750 manuals
Add to My Manuals
Save this manual to your list of manuals |
Page 6 highlights
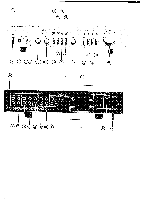
AC convenience outlets* Two AC outlets (34) on the rear panel of the hk750, provide power connections for turntables, tape decks or other equipment. One is marked UNSWITCHED and provides power whether the preamplifier is turned on or not. The other, marked SWITCHED, provides power only when the preamplifier is turned on. If you have completed the connections above, you are now ready to place the hk750 in its permanent position and plug the POWER LINE CORD (35) into an AC outlet. To turn the unit on and off, press the POWER switch (2). When power is on, the POWER indicator (1) will light. To operate your hk750 integrated amplifier To play records Depress the appropriate PHONO pushbutton (18) (19), activate your turntable, and advance the VOLUME control (22) clockwise to a comfortable level. If you hear a hum at average listening levels, turn the POWER switch (2) off and check to see that phono and ground connections are secure. To listen to your tuner Depress the TUNER pushbutton (20) activate your tuner and advance the VOLUME control (22) clockwise to a comfortable level. Auxiliary equipment If you have connected other equipment to the AUXILIARY INPUT connectors (27), you may listen to this program source by pressing the AUXILIARY pushbutton (21). To play tapes The TAPE MONITOR pushbuttons (11) (12) admit programs from tape decks connected to the TAPE 1 INPUT connectors (28) and TAPE 2 INPUT connectors (30). When you wish to play a tape or program source connected to the TAPE 1 INPUT (28), depress the TAPE MONITOR pushbutton (11) to its MONITOR position (in) and place the TAPE MONITOR 1/2 pushbutton (12) in its TAPE 1 position (out). To play a tape or program from TAPE 2 INPUT connectors (30), place the TAPE MONITOR pushbutton (11) in the MONITOR position (in) and depress the TAPE MONITOR 1/2 pushbutton (12) to its TAPE 2 position (in). To record tapes The hk750 allows you to record pro- gram materials from any source selected by the function control pushbuttons (18) (19) (20) (21). Place the TAPE COPY SOURCE/ COPY pushbutton (9) in its SOURCE position (out). Activate the program source and place tape deck 1, tape deck 2 or both in record mode. To listen to the original program, place the TAPE MONITOR pushbutton (11) in its SOURCE POSITION (out). To monitor the new recordings as they are being made press the TAPE MONITOR pushbutton (11) to its MONITOR position (in) and select the tape deck to be monitored with the TAPE MONITOR 1/2 pushbutton (1-out, 2-in) (12). The VOLUME control (22), BALANCE control (17), and various tone controls do not affect the signal at the TAPE OUTPUT connectors (29) (31). Hence you may change the settings of these controls without altering a tape recording in progress. To copy tapes When copying material from one tape deck to another, the TAPE COPY SOURCE/COPY pushbutton (9) should be pressed to the COPY position (in). To copy material from tape deck 1 on to tape deck 2, the TAPE COPY (1 to 2)/(2 to 1) pushbutton (10) should be left in the "1 to 2" position. Put tape deck 1 in the play mode and tape deck 2 in the record mode. *In some countries, owing to Safety Agency Electrical requirements, these AC receptacles are covered. 6
-
 1
1 -
 2
2 -
 3
3 -
 4
4 -
 5
5 -
 6
6 -
 7
7
 |
 |
