Harman Kardon HK795I Owners Manual - Page 7
Harman Kardon HK795I Manual
 |
View all Harman Kardon HK795I manuals
Add to My Manuals
Save this manual to your list of manuals |
Page 7 highlights
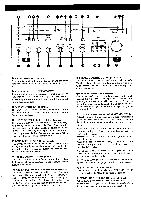
CONTROLS AND FUNCTIONS ® LOUDNESS SWITCH (loudness) This switch is pressed to create a natural sound quality when listening at a low volume by boosting the low and high frequency ranges. ED AUDIO MODE SWITCH (audio mode) This switch is used to combine the left and right channels and create a mono signal. Usually it is set in the stereo position (button out). If the FM stereo broadcast station you are listening to is weak and there is a lot of noise, set this switch to "mono". The two channels are combined into a monaural signal, but the noise is reduced for more comfortable listening. ® TAPE OUT SELECTOR (TAPE OUT) This selector is used for recording from another input on the tape deck(s) connected to the "TAPE 1" and/or "TAPE 2" jacks, for dubbing between two tape decks or for recording another sound source independent of the "FUNCTION" selector. "phono", "CD": In this position, the phono or CD signal is available at the "TAPE 1 OUT" and "TAPE 2 OUT" jacks regardless of the position of the "FUNCTION" selector. This permits recording the pnono or CD signal on the tape deck(s) connected to "TAPE 1" and/or "TAPE 2" jacks while using the preamplifier and power amplifier sections in another mode (listening to AM, FM, phono, CD, video, or other sources, for example). "source": Select this position to record the program source selected by the "FUNCTION" selector in either or both of the two tape decks connected to the "TAPE 1" and "TAPE 2" jacks. "copy-1 to 2": Select this position to duplicate the tape in the deck connected to the "TAPE 1" jacks onto the tape in the deck connected to the "TAPE 2" jacks. "copy-2 to I": Select this position to duplicate the tape in the deck connected to the "TAPE 2" jacks onto the tape in the deck connected to the "TAPE 1" jacks. ® FUNCTION SELECTOR (FUNCTION) This selector is used to select a program source other than a tape. "phono": Select this position to listen to a disc played on the turntable connected to the "PHONO INPUT" jacks. "am": Select this position to listen to an AM broadcast. "fm": Select this position to listen to an FM broadcast. "CD": Select this position to listen to disc played on the compact disc player connected to the "CD INPUT" jacks. "video/aux": Select this position to listen to the sound from the video component, the TV tuner or other component connected to the "VIDEO/AUX INPUT" jacks. lb FUNCTION INDICATORS Each "FUNCTION" indicator illuminates in red corresponding to the setting of the "FUNCTION" selector. 41) MUTING SWITCH (fm muting) This switch is used to tune in a weak station. Press this switch to the "off " position, which deactivates the muting function. This muting feature applies to both FM and AM reception. The muting level can be controlled by the "MUTE ADJ." control (FM muting level adjusting) on the rear panel. Turn it clockwise to increase or counterclockwise to decrease the muting level. ® TUNING BUTTONS (TUNING) These buttons are used to tune to a desired broadcast frequency. "down" button: When this button is pressed, the tuned frequency will decrease to a lower frequency. "up" button: When this button is pressed, the tuned frequency will increase to a higher frequency. By setting the frequency step selectors on the bottom panel, tuning can be performed by steps of either 50kHz or 100kHz for FM, 9kHz or 10kHz for AM. (1) STATION DISPLAY This digital display indicates the band (AM or FM) and frequency of the tuned station. ® SIGNAL STRENGTH INDICATOR The relative strength of the signal being received is displayed by this indicator. Tune and adjust the antenna position for the highest possible indication. ® TUNED INDICATOR This indicator turns on when a broadcast frequency is correctly tuned in. It may not light up for a weak station, even when it is correctly tuned. GI FM STEREO INDICATOR This indicator is illuminated when an FM stereo broadcast is received. €1;) TUNING MODE SELECTOR (auto and manual) Either an automatic or manual tuning mode can be selected. When the "auto" switch is pressed, it will illuminate in green and the unit will scan up or down to the next station when the "up" or "down" TUNING button is pressed. When the "manual" switch is pressed, it will illuminate in green and tuning can be made manually in small steps by pressing the "up" or "down" TUNING button. ® PRESET MEMORY BUTTONS (FM/AM PRESET MEMORY) Press any one of the eight "FM/AM PRESET MEMORY" buttons while the "memory" switch is illuminated in green, and the frequency indicated by the STATION DISPLAY is memorized by that "FM/AM PRESET MEMORY" button. Each position can memorize one frequency in both the FM and AM bands, for a total capability of sixteen stations being preset in the memory. Once a station frequency is memorized, it can be recalled any time the same "FM/AM PRESET MEMORY" button is pressed. When the "FM/AM PRESET MEMORY" button is pressed, it illuminates in green, indicating the button is in use. e MEMORY SWITCH (memory) This switch is used to enter or change the preset broadcast stations. When this switch is pressed, it will illuminate in green for about 12 seconds. This indicates the preset memory standby state. NOTE: If you do not press an "FM/AM PRESET MEMORY" button while the "memory" switch is illuminated, memory presetting can not be made. ® VOLUME CONTROL KNOB (VOLUME) This knob controls the sound level. Turning clockwise increases the sound volume, and turning counterclockwise decreases it. Set this knob at a minimum level before turning the power on or changing the sound source to protect the speakers from being damaged by a sudden high level sound. 6
-
 1
1 -
 2
2 -
 3
3 -
 4
4 -
 5
5 -
 6
6 -
 7
7 -
 8
8 -
 9
9 -
 10
10 -
 11
11
 |
 |
