Harman Kardon T40 Owners Manual - Page 4
General, Instructions
 |
View all Harman Kardon T40 manuals
Add to My Manuals
Save this manual to your list of manuals |
Page 4 highlights
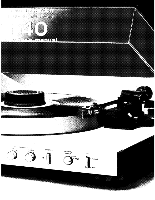
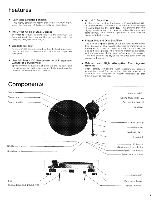
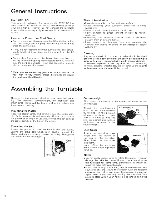
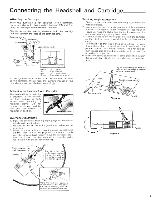
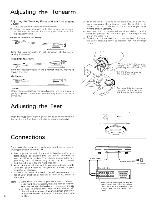
General Instructions Use 120V AC This turntable is designed for operation with 120V AC. Use only domestic AC outlets or the AC convenience outlet of your amplifier or receiver. Do not connect the turntable to an outlet supplying a higher voltage, it can create a fire hazard. Handle the Power Line Cord Gently • Do not disconnect the plug from the AC outlet by pul l ing the cord; always pul l the plug itself. Pul l ing the cord may break the connection. • If you do not intend to use your turntable for any considerable length of time, disconnect the plug from the AC outlet. • Do not place furniture or other heavy objects on the cord, and try to avoid dropping heavy objects upon it. Not only may the cord be damaged, it can also cause short circuits with a consequent fire hazard. *While you are connecting your turntable to the rest of your high fidelity system, please disconnect the power line cord from the AC outlet. Place of Installation • Place the turntable on a firm and level surface. • Avoid installing your turntable under the following conditions: • Moist or humid places (bathroom or kitchen). ► Places exposed to direct sunl ight or close to heating equipment. ► Extremely cold locations such as those in the direct draught from an air conditioner► Places subject to vibrations from your speakers, the opening and closing of doors, or the passage of people walking by. Cleaning Any accumulated dirt on your turntable should be wiped off with a clean, soft dry cloth. Stubborn dirt can be wiped away with a cloth dampened with a mild soap or detergent. Afterwards, wipe with a clean dry cloth. Do not use alcohol, thinners, benzene, insecticides, etc. or other volati le agents as these may cause the paint finish to peel. Assembling the Turntable. Remove the turntable and the dust cover from their packing. The headshell, counterweight, disc stabilizer, and other smal l items wi l l be found within the polystyrene foam cushion packing. Mounting the Platter Place the platter gently and careful ly over the center spindle. Push down gently and vertically. If you try to mount the platter at an angle or use undue force, this can damage the center spindle or the hole in the platter. Threading the Belt Rotate the platter so that the hole is over the pul ley. Extend the drive belt which is in position around the platter, and place it in the groove on the pulley. Then, place the platter mat on the platter. Pulley Drive bit Cou nterweight First clamp the tonearm on the armrest and move the cue lever forward. Thread the counterweight onto the rear of the tonearm by turning it in the direction of arrow as shown. If you find it wi l l not go onto the arm, use a smal l al ien wrench to loosen the screw in the counterweight. Court terweigh t Dust Cover Attach the two dust cover hinges into the sockets at the rear of the turntable. Then, insert the dust cover into them. Note: Close the dust cover while reproduction to prevent howling. Oust cover A Note: • Do not apply undue force to rotate the platter. This can damage the drive belt. Also, if you do not intend to use the turntable for some time, particularly in winter, remove the drive belt from the pul ley. • If you are moving house, etc., remove the headshell and counterweight and secure the tonearm with the tonearm clamp so that it does not move. Also remove the platter. Again, even if you are only moving the turntable from place to place within your home, do be sure to clamp the tonearm. 4
-
 1
1 -
 2
2 -
 3
3 -
 4
4 -
 5
5 -
 6
6 -
 7
7
 |
 |
