Harman Kardon T40 Owners Manual - Page 6
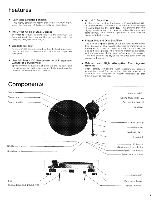
Adjusting, Tonearm, Connections
 |
View all Harman Kardon T40 manuals
Add to My Manuals
Save this manual to your list of manuals |
Page 6 highlights
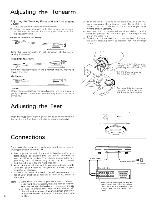
Adjusting the Tonearm Adjusting the Tracking Force and the Anti-skating Device 1. Move the tonearm away from the armrest 2. Adjust the counterweight until the tonearm is horizon- tal. Be sure to remove the stylus guard when adjusting the counterweight. *Rear of Tonearm too Heavy Turn the counterweight in the direction of the arrow, moving it forward. • Headshell too Heavy Turn the counterweight in the direction shown, moving it toward the rear. • In Balance Turn the stylus tracking force scale ring until the "O" mark is opposite the indication mark. Be careful not to disturb the zero balance of the counterweight when making this adjustment. Now set the recommended cartridge stylus tracking force by turning the counterweight to the required figure on the scale ring. Finally, set the anti-skating control so that it indicates the same tracking force as selected for the cartridge stylus. 1.5 ' 1,1i1/,:;44 iii When you turn the counterweight, the tracking force scale ring will turn with it. Set the tracking force to the indication mark. Caution While you are adjusting the zero balance, hold the tonearm aently to prevent the stylus from coming into contact with anything. Adjusting the Feet With the dust cover closed, adjust the level of the turntable by turning the four feet clockwise or counterclockwise. Set the anti-skating control normally to the same as the !Jacking force setting_ CA Connections Only make the connections with your amplifier or receiver unplugged and/or switched off. 1 . The plugs on the end of the output lead from this turntable should be plugged into the phono terminals of your amplifier or receiver. They should be pushed firmly and fully in. The white plug is for the left channel and the red plug is for the right channel. 2. Attach the ground wire which comes from the turntable with the output lead to the ground terminal of your ampl ifier or receiver. 3. Connect the power line cord to an AC convenience outlet of your amplifier or receiver or into an AC outlet in the room. Note: • Make sure that the output leads are not trapped underneath the turntable, the amplifier or receiver. This can damage the leads and cause open circuits. • Be sure to attach the leads to the MM or MC phono input terminals of your amplifier or receiver in accordance with the type of the cartridge (MM 6 or MC). Output leads Ground wire a OO a a O1O a Power line cord AC outlet 0000 0000 With certain cartridges, it may be better from the point of view of reducing hum not to connect the ground lead to the ground terminal.
-
 1
1 -
 2
2 -
 3
3 -
 4
4 -
 5
5 -
 6
6 -
 7
7
 |
 |
