Hayward C100S SwimClear Single Element Manual - Page 4
General Information, Pump Selection And Location, Filter Location, Plumbing, Fig. 1, Fig. 2 - c100 cartridge
 |
View all Hayward C100S manuals
Add to My Manuals
Save this manual to your list of manuals |
Page 4 highlights
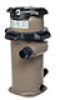
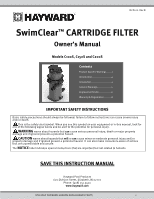
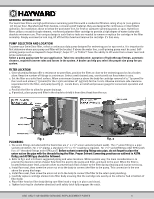
GENERAL INFORMATION The SwimClear filters are high performance swimming pool filters with a residential filtration rating of up to 7200 gallons (27 kL) per hour. Manufactured from durable, corrosion-proof material, they are designed for continuous or intermittent operation, for installation above or below the pool water line, for fresh or saltwater swimming pools or spas. SwimClear filters utilize a reusable single element, reinforced polyester filter cartridge to provide a high degree of water clarity with absolute minimum care. Their unique design is such that no tools are needed to remove or replace the cartridge in the filter assembly. Simply unscrew the lock ring, lift off the filter head and remove the cartridge. It's that easy. PUMP SELECTION AND LOCATION To power your SwimClear filter, select a continuous duty pump designed for swimming pool or spa service. It is important to first determine where your pump and filter will be located. If above the water line, a self-priming pump must be used. Selfpriming pumps such as Hayward's Super Pump®, Super II, or TriStarTM have the ability to lift water from a lower level and prime automatically. Select a pump appropriate for your application. Take into consideration: operation of hydrotherapy fittings, automatic cleaners, required turnover rates and losses in the system. A dealer can help you select the proper size pump for you system. FILTER LOCATION 1. Since plumbing fittings offer a resistance to water flow, position the filter as close to the swimming pool as local codes allow. Keep the number of fittings to a minimum. Select a well-drained area, one that will not flood when it rains. 2. Set the filter on a solid level surface. Allow a minimum clearance above the body for cartridge removal of 12" (305mm) for the C100S and allow 15" (381mm) for the C150S and allow 18" (457mm) for the C200S. Observe minimum side clearance requirements for the filter, and pump (see fig.3). Locate drain, air relief and pressure gauge for convenient operation and viewing. 3. Position the filter to allow for proper drainage. 4. If practical, place pump and filter in the shade to shield it from direct heat from the sun. MOUNTING HOLE Fig. 1 Fig. 2 PLUMBING 1. The union fittings included with the SwimClear are 2" x 2 ½" union sockets (solvent weld). The 2" union fitting is a pipe socket connection. For 2 ½" piping, a standard 2 ½" x 2 ½" coupling is required. For 1 ½" socket fittings order SPX1500JS. For 1 ½" threaded fittings order SPX1500JT. Before solvent cementing fitting onto pipe, do not forget to place the union nut on the pipe with the threads facing the filter. Proper Solvent Cementing practices as outlined in ASTM D2855 and ASTM F493 should be followed. 2. Refer to fig.1 and 2 for basic suggested piping and valve locations. While systems vary, the main consideration is to provide the desired control of water flow from the pool to the pump and filter, and back to the pool. When the filter is located below water level, provide valves to prevent back flow of water to the filter during cleaning and routine servicing. 3. Install face seal, then screw the union nut on to the body to connect the filter to the pump. This connection is the one above the pump discharge 4. Install face seal, then screw the union nut on to the body to connect the filter to the return pool plumbing. 5. Carefully replace cartridge element into filter body ensuring that the cartridge sits evenly on the collector hub in bottom of filter body. 6. Place filter head on filter body (being sure filter head 0-ring is in place and clean). 7. Tighten lock ring (in clockwise direction) until safety latch fully engages the catch. USE ONLY HAYWARD GENUINE REPLACEMENT PARTS 4
-
 1
1 -
 2
2 -
 3
3 -
 4
4 -
 5
5 -
 6
6 -
 7
7 -
 8
8
 |
 |