Hayward Chlorine Model: ALL MODELS - Page 6
Maintenance - feeder cl200
 |
View all Hayward Chlorine manuals
Add to My Manuals
Save this manual to your list of manuals |
Page 6 highlights
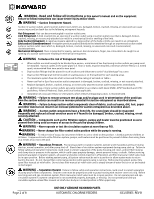
WARNING Do not inhale fumes from the chlorinator or chemical container. WARNING Chlorine feeder may be under pressure. Use caution removing cover. REFILLING CHORINATOR 1. Shut off all pumps and pump timers. 2. Turn chlorine feeder flow control valve to "OFF". 3. Verify chlorine feeder return line to pool is unrestricted. 4. Wait one minute to relieve system pressure before attempting to remove cover. 5. If installed in a flooded system, shut off valves to isolate chlorinator. 6. Remove cover. 7. Refill chlorine feeder with slow dissolving Trichlor-Chlorine Tablets. 8. Secure cover to chlorine feeder. 9. If installed in a flooded system, open valves to assure flow from pump to pool. 10.Turn flow control valve on chlorinator to desired setting and restart pump. MAINTENANCE: TO CHANGE O-RING CL100/110 1. Read and follow instructions in Steps 1 to 5 in Refilling Chlorinator section. 2. Remove the O-Ring and replace with a Genuine Hayward Part O-Ring (part no. CLX110K). 3. Replace cover. If chlorinator needs to be refilled, read and follow instructions in Steps 6 to 8 in Refilling chlorinator section. TO CHANGE O-RING CL200/220 1. Read and follow instructions in Steps 1 to 5 in Refilling Chlorinator section. 2. Pry off Logo Cap, located on the cover of the chlorinator. Unscrew and remove retainer screw. Cover may now be slipped free of the Cover Cap. 3. Replace O-ring with a Genuine Hayward Part O-ring (part no. CLX200K). Reassemble being sure Slip Washers are in place on stem of Cover (inside), and under head of Retaining Screw. 4. Replace cover. If chlorinator needs to be refilled, read and follow instructions in Steps 6 to 8 in Refilling Chlorinator section. TO REMOVE FLOW CONTROL VALVE HANDLE Set pointer to FULL. Insert screwdriver in slot opposite pointer, lift up and rotate handle counterclockwise. This allows the handle index lock tab to clear the body ridge. TO INSTALL FLOW CONTROL VALVE HANDLE 1 The flow control valve handle Genuine Hayward Part (CLX200PA) is furnished in two pieces. 2 To install push the handle into the stem and fully install stem into body. You may have to remove handle and reposition to assure the stem is fully seated. 3 Remove handle by pulling straight out. 4 Apply a single drop of Super Glue to the end of the stem, push on handle, positioned in the OFF position. Apply pressure for 30 seconds. WINTERIZING Where freezing temperatures can be expected, drain all water and remove all chlorine from c h lori na t or. (F or in-line permanently installed unit remove drain plug). Carefully remove all tablets and pieces of tablets. Rinse out chlorinator thoroughly with water. Replace cover and drain plug. VACUUMING When vacuuming, close flow control valve to prevent bypass of sediment and possible clogging of control valve. LUBRICATION Never use petroleum type lubricants on Cover O-Ring. To lubricate use Genuine Hayward Part Jack's Lube No. 327 (Part No. SP032712). Page 6 of 8 USE ONLY GENUINE HAYWARD PARTS AUTOMATIC CHLORINE FEEDERS ISCLSERIES REV B
-
 1
1 -
 2
2 -
 3
3 -
 4
4 -
 5
5 -
 6
6 -
 7
7 -
 8
8
 |
 |