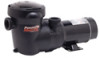
Hayward PowerFlo Matrix Models: SP1591 SP1592 SP15922S SP1592FT SP1592FTTL - Page 8
Storage/Winterization cont., Start-Up For Winterized Equipment, Shaft Seal Change Instructions, SAVE - twist lock
 |
View all Hayward PowerFlo Matrix manuals
Add to My Manuals
Save this manual to your list of manuals |
Page 8 highlights
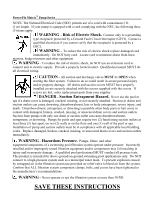
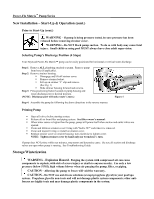
Power-Flo Matrix™ Pump Series Storage/Winterization (cont.) Drain all water from pump and piping when expecting freezing temperatures or when storing pump for a long time (see instructions below). Gravity drain system as far as possible. Keep motor dry and covered during storage. To avoid condensation/corrosion problems, do NOT cover or wrap pump with plastic film or bags. Storing Pump For Winterization WARNING - To avoid dangerous or fatal electrical shock hazard, turn OFF power to motor before draining pump. 1. Drain water level below all inlets to the pool. 2. Remove drain plug from bottom of strainer body. 3. Disconnect pump from base. 4. Once the pump is removed of water, re-install the strainer lid and strainer plug. 5. Store pump in a dry enclosure. Start-Up For Winterized Equipment 1. Securely mount pump to base. 2. Install all intake and output fittings and piping. 3. Refill pool to proper water level. 4. Prime pump according to instructions. Shaft Seal Change Instructions IMPORTANT SAFETY INSTRUCTIONS PLEASE READ AND FOLLOW ALL INSTRUCTIONS When servicing electrical equipment, basic safety precautions should always be observed including the following. Failure to follow instructions may result in injury. A. WARNING - To reduce risk of injury, do not permit children to use this product. B. Disconnect all electrical power service to pump before beginning shaft seal replacement. C. Only qualified personnel should attempt rotary seal replacement. Contact your local authorized Hayward Dealer or service center if you have any questions. D. The National Electrical Code requires either a three (3) foot maximum twist-lock cord set with a GFCI protected receptacle or hard wire (conduit) connection for swimming pool pump installation. Do not use extension cords. SAVE THESE INSTRUCTIONS Exercise extreme care in handling both the rotating and the stationary sections of the two-part replacement seal. Foreign matter or improper handling will easily scratch the graphite and ceramic sealing surfaces. 1. Shut off water flow to pump by closing appropriate valves or by plugging both the skimmer outlet port and return port to pool. Disconnect piping or hoses from the motor/pump assembly. 2. Remove the strainer by disengaging and removing the strainer cover. Remove the basket. Lift up on strainer 'C' clip and remove. Finally, slide strainer housing forward and remove. 3. Unscrew eight (8) screws and remove pump cover, exposing the impeller. 4. Remove the canopy or the shaft cover plate from the end of motor opposite the impeller.
-
 1
1 -
2
-
 3
3 -
 4
4 -
 5
5 -
 6
6 -
 7
7 -
 8
8 -
 9
9 -
 10
10 -
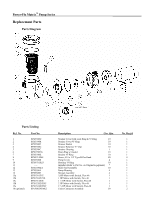 11
11 -
 12
12 -
 13
13
 |
 |
