HealthRider Hotel Fitness Dc9800 English Manual - Page 11
Then, remove the Left Cable Cover.
 |
View all HealthRider Hotel Fitness Dc9800 manuals
Add to My Manuals
Save this manual to your list of manuals |
Page 11 highlights
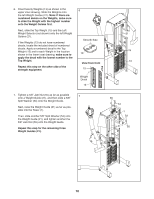
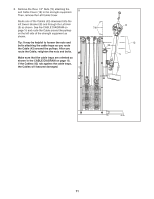
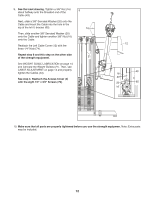
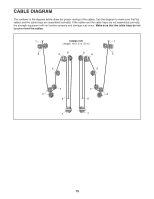
8. Remove the three 1/4" Nuts (74) attaching the 8 Left Cable Cover (12) to the strength equipment. Then, remove the Left Cable Cover. Route one of the Cables (43) downward into the left Swivel Bracket (8) and through the Left Arm (5) as shown. See the CABLE DIAGRAM on page 15 and route the Cable around the pulleys on the left side of the strength equipment as shown. Tip: It may be helpful to loosen the nuts and bolts attaching the cable traps as you route the Cable (43) around the pulleys. After you route the Cable, retighten the nuts and bolts. Make sure that the cable traps are oriented as shown in the CABLE DIAGRAM on page 15; if the Cables (43) rub against the cable traps, the Cables will become damaged. 8 74 12 43 5 11
-
 1
1 -
2
-
3
-
4
-
5
-
 6
6 -
 7
7 -
 8
8 -
 9
9 -
 10
10 -
 11
11 -
 12
12 -
 13
13 -
 14
14 -
 15
15 -
 16
16 -
17
-
18
-
19
-
20
 |
 |

11
8.
Remove the three 1/4" Nuts (74) attaching the
Left Cable Cover (12) to the strength equipment.
Then, remove the Left Cable Cover.
Route one of the Cables (43) downward into the
left Swivel Bracket (8) and through the Left Arm
(5) as shown. See the CABLE DIAGRAM on
page 15 and route the Cable around the pulleys
on the left side of the strength equipment as
shown.
Tip: It may be helpful to loosen the nuts and
bolts attaching the cable traps as you route
the Cable (43) around the pulleys. After you
route the Cable, retighten the nuts and bolts.
Make sure that the cable traps are oriented as
shown in the CABLE DIAGRAM on page 15;
if the Cables (43) rub against the cable traps,
the Cables will become damaged.
8
8
43
5
12
74