HealthRider Hr2 Rider English Manual - Page 5
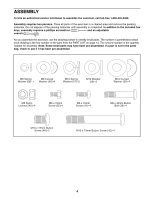
Screws 42 and two M10 Curved Washers 59.
 |
View all HealthRider Hr2 Rider manuals
Add to My Manuals
Save this manual to your list of manuals |
Page 5 highlights
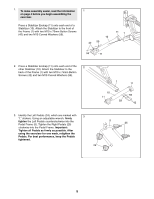
1. To make assembly easier, read the information on page 4 before you begin assembling the exerciser. Press a Stabilizer Endcap (11) onto each end of a Stabilizer (10). Attach the Stabilizer to the front of the Frame (1) with two M10 x 75mm Button Screws (42) and two M10 Curved Washers (59). 1 10 42 59 11 1 59 11 2. Press a Stabilizer Endcap (11) onto each end of the 2 other Stabilizer (10). Attach the Stabilizer to the back of the Frame (1) with two M10 x 75mm Button Screws (42) and two M10 Curved Washers (59). 1 11 10 11 59 59 42 3. Identify the Left Pedals (24), which are marked with 3 "L" stickers. Using an adjustable wrench, firmly tighten the Left Pedals counterclockwise into the Pedal Frame (5). Tighten the Right Pedals (25) clockwise into the Pedal Frame. Important: Tighten all Pedals as firmly as possible. After using the exerciser for one week, retighten the Pedals. For best performance, keep the Pedals tightened. 5 25 24 5
-
 1
1 -
 2
2 -
 3
3 -
 4
4 -
 5
5 -
 6
6 -
 7
7 -
 8
8 -
 9
9 -
 10
10 -
 11
11 -
12
-
13
-
14
-
15
-
16
 |
 |
