HealthRider Hr2 Rider English Manual - Page 6
four M6 x 16mm Screws 41. Note: The Screws
 |
View all HealthRider Hr2 Rider manuals
Add to My Manuals
Save this manual to your list of manuals |
Page 6 highlights
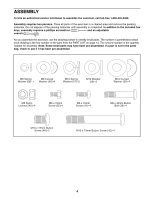
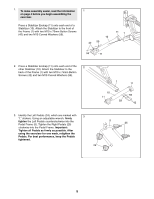
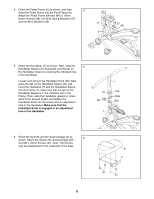
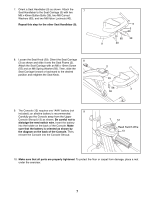
4. Orient the Pedal Frame (5) as shown, and then 4 insert the Pedal Frame into the Pivot Frame (6). Attach the Pedal Frame with two M10 x 15mm Button Screws (48), two M10 Spring Washers (57), and two M10 Washers (58). 6 5 58 57 48 5. Orient the Handlebar (7) as shown. Next, slide the 5 Handlebar Sleeve (31) downward until the tab on the Handlebar Sleeve is covering the indicated hole in the Handlebar. Loosen and remove the Handlebar Knob (28). Next, press the tab on the Handlebar Sleeve (31) and insert the Handlebar (7) and the Handlebar Sleeve into the Frame (1); make sure that the tab on the Handlebar Sleeve is in the indicated slot in the Frame. Then, slide the Handlebar upward or downward to the desired height, and tighten the Handlebar Knob into the Frame and an adjustment hole in the Handlebar. Make sure that the Handlebar Knob is engaged in an adjustment hole in the Handlebar. 31 28 1 7 Tab Hole Slot 6. Orient the Seat (8) and the Seat Carriage (3) as 6 shown. Attach the Seat to the Seat Carriage with four M6 x 16mm Screws (41). Note: The Screws may be preattached to the underside of the Seat. 6 8 3 41 41
-
 1
1 -
 2
2 -
 3
3 -
 4
4 -
 5
5 -
 6
6 -
 7
7 -
 8
8 -
 9
9 -
 10
10 -
 11
11 -
 12
12 -
13
-
14
-
15
-
16
 |
 |
