HealthRider S400 Treadmill English Manual - Page 2
How to Use the HealthRider, Chest Pulse Sensor
 |
View all HealthRider S400 Treadmill manuals
Add to My Manuals
Save this manual to your list of manuals |
Page 2 highlights
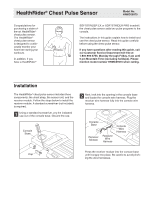
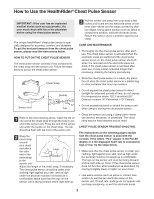
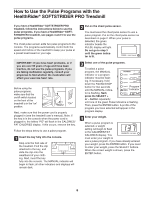
How to Use the HealthRider® Chest Pulse Sensor IMPORTANT: If the user has an implanted medical device such as a pacemaker, the user must check with his or her physician before using the chest pulse sensor. The unique HealthRider® chest pulse sensor is specially designed for accuracy, comfort, and durability. To get the best performance from the chest pulse sensor, please read the instructions below. HOW TO PUT ON THE CHEST PULSE SENSOR The chest pulse sensor consists of two components: the chest strap and the sensor unit. Follow the steps below to put on the chest pulse sensor. 3 Pull the sensor unit away from your body a few inches and locate the two electrode areas on the inner side-these are the areas covered by shallow ridges. Using saline solution such as saliva or contact lens solution, wet both electrode areas. Return the sensor unit to a position against your chest. CARE AND MAINTENANCE • Thoroughly dry the chest pulse sensor after each use. The chest pulse sensor is activated when the electrode areas are wetted and the chest pulse sensor is put on; the chest pulse sensor shuts off when it is removed and the electrode areas are dried. If the chest pulse sensor is not dried after each use, it may remain activated longer than necessary, draining the battery prematurely. Chest Strap • Store the chest pulse sensor in a warm, dry place. Do not store the chest pulse sensor in a plastic bag or other container that may trap moisture. Buckle • Do not expose the chest pulse sensor to direct sunlight for extended periods of time; do not expose it to temperatures above 122° Fahrenheit (50° Celsius) or below 14° Fahrenheit (-10° Celsius). Sensor Unit • Do not excessively bend or stretch the sensor unit Tab when using or storing the chest pulse sensor. 1 Refer to the inset drawing above. Insert the tab on one end of the chest strap through the hole in one end of the sensor unit. Press the end of the sensor unit under the buckle on the chest strap. The tab should be flush with the front of the sensor unit. 2 Wrap the chest strap around your chest and attach the other Logo end of the chest strap to the sensor unit. Adjust the length of the chest strap, if necessary. The chest pulse sensor should be under your clothing, tight against your skin, and as high under the pectoral muscles or breasts as is comfortable. Make sure that the logo on the sensor unit is facing forward and is right-side-up. • Clean the sensor unit using a damp cloth-never use alcohol, abrasives, or chemicals. The chest strap may be hand washed and air dried. CHEST PULSE SENSOR TROUBLE-SHOOTING The instructions on the following pages explain how the chest pulse sensor is used with the console. If the letters "PLS" appear in the PULSE display or if the displayed heart rate is excessively high or low, try the steps below. • Make sure that the chest pulse sensor is under your clothing, tight against your skin, and as high under the pectoral muscles or breasts as is comfortable. The logo on the sensor unit must be facing forward and be right-side-up. Note: If the chest pulse sensor does not function when positioned as described, try moving it slightly lower or higher on your chest. • Use saline solution such as saliva or contact lens solution to wet the two electrode areas on the sensor unit. If heart rate readings do not appear until you begin perspiring, re-wet the electrode areas. 2
-
 1
1 -
 2
2 -
 3
3 -
 4
4 -
 5
5 -
 6
6 -
 7
7 -
 8
8
 |
 |
