HP 1000 HP Photo Scanner 1000 - (English) Photo Scanner Quick Reference Guide - Page 1
HP 1000 - Photo Scanner Manual
 |
View all HP 1000 manuals
Add to My Manuals
Save this manual to your list of manuals |
Page 1 highlights
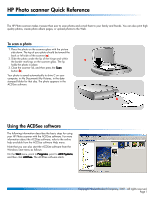
HP Photo scanner Quick Reference The HP Photo scanner makes it easier than ever to scan photos and e-mail them to your family and friends. You can also print highquality photos, create photo album pages, or upload photos to the Web. To scan a photo 1. Place the photo on the scanner glass with the picture side down. The top of your photo should be toward the back or left side of the scanner (a). 2. Slide the photo under the lip of the hinge and within a the border markings on the scanner glass. The lip holds the photo in place. 3. Close the scanner lid, and then press the Scan button (b). Your photo is saved automatically to drive C on your computer, in My Documents\My Pictures, in the datestamped folder for that day. The photo appears in the ACDSee software. b Using the ACDSee software The following information describes the basic steps for using your HP Photo scanner with the ACDSee software. For more information about the ACDSee software, refer to the online help available from the ACDSee software Help menu. Note that you can also start the ACDSee software from the Windows Start menu as follows: On the Start menu, point to Programs, point to ACD Systems, and then click ACDSee. The ACDSee software starts. Copyright Hewlett-Packard Company, 2001. All rights reserved. Page 1
-
 1
1 -
 2
2 -
 3
3 -
 4
4
 |
 |
