HP 2500c HP 2500C/C+/CM Professional Series Color Printer - (English) Getting - Page 13
Step 10 - Install the Printer Software - driver
 |
View all HP 2500c manuals
Add to My Manuals
Save this manual to your list of manuals |
Page 13 highlights
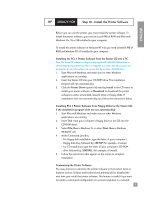
ENGLISH HP 2500C/C+/CM Step 10 - Install the Printer Software Before you can use the printer, you must install the printer software. To install the printer software, you need at least 8 MB of RAM and Microsoft Windows 3.1x, 95 or 98 installed in your computer. To install the printer software in Windows NT 4.0, you need at least 16 MB of RAM and Windows NT 4.0 installed in your computer. Installing the PCL 3 Printer Software from the Starter CD into a PC Note: The Starter CD includes a utility to easily copy the HP 2500C/C+/CM software to 3.5-inch high-density diskettes as well as to copy files to a server. This allows you to use the diskettes to install the software on systems that do not have a CD-ROM drive. 1. Start Microsoft Windows and make sure no other Windows applications are running. 2. Insert the Starter CD into your CD-ROM drive. The installation program will run automatically. 3. Click the Printer Driver option followed by Install in the CD menu to install your printer software or Download to download the printer software to either a hard disk, network drive or floppy disks. If installation does not automatically run, follow the instructions below. Installing PCL 3 Printer Software from Floppy Disks (or the Starter CD, if the installation program does not run automatically) 1. Start Microsoft Windows and make sure no other Windows applications are running. 2. Insert Disk 1 into your computer's floppy drive (or the CD into the CD-ROM drive). 3. Select File, Run in Windows 3.1 or select Start, Run in Windows 95/98/NT 4.0. 4. At the Command Line Box, • For floppy disk installation, type the letter of your computer's floppy disk drive followed by :\SETUP (for example, a:\setup). • For CD installation, type the letter of your computer's CD-ROM drive followed by :\INSTALL (for example, d:\install). 5. Follow the instructions that appear on the screen to complete installation. Customizing the Printer Software You may choose to customize the printer software so that certain items or features such as Toolbox and bi-directional printing will be disabled the next time you install the printer software. This feature is useful if you want to install a customized configuration on several computers in a network. 11
-
 1
1 -
2
-
3
-
4
-
5
-
6
-
7
-
 8
8 -
 9
9 -
 10
10 -
 11
11 -
 12
12 -
 13
13 -
 14
14 -
 15
15 -
 16
16 -
 17
17 -
 18
18 -
19
-
20
-
21
-
22
-
23
-
24
-
25
-
26
-
27
-
28
-
29
-
30
 |
 |