HP 3020 Cisco Catalyst Blade Switch 3020 for HP Getting Started Guide - Page 1
HP 3020 - Cisco Catalyst Blade Switch Manual
 |
UPC - 882658086625
View all HP 3020 manuals
Add to My Manuals
Save this manual to your list of manuals |
Page 1 highlights
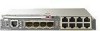
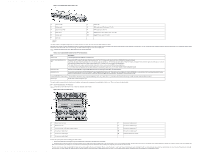
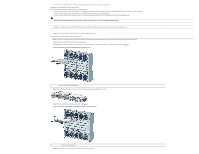
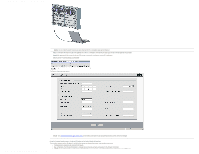
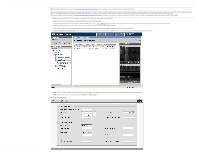
Cisco Catalyst Blade Switch 3020 for HP Getting Started Guide [Cisco Catalyst Blade Switch 3000 Series] - Cisco Systems Home | Skip to Content | Skip to Search | Skip to Navigation | Skip to Footer | Worldwide [change] Log In |Register |About Cisco Guest Search Search Solutions Hierarchical Navigation Products & Services q HOME r SUPPORT s PRODUCT SUPPORT s SWITCHES s CISCO CATALYST BLADE SWITCH 3000 SERIES s INSTALL AND UPGRADE s INSTALL AND UPGRADE GUIDES s Cisco Catalyst Blade Switch 3020 for HP Getting Started Guide Feedback: Help us help you Please rate this document. Excellent Good Average Fair Poor This document solved my problem. Yes No Just Browsing Suggestions to improve this document. (512 character limit) If you have provided a suggestion, please enter your full name and e-mail address. This information is optional and allows us to contact you if necessary. Name: E-mail: Submit Ordering Support Cisco Catalyst Blade Switch 3000 Series Cisco Catalyst Blade Switch 3020 for HP Getting Started Guide Table Of Contents Cisco Catalyst Blade Switch 3020 for HP Getting Started Guide Introduction Taking Out What You Need Cisco Gigabit Ethernet Switch Module Description HP c-Class BladeSystem Architecture Installing the Switch Module in the Blade Server Switch Module IP Addresses Running Express Setup Information You Need to Run Express Setup Using Express Setup to Assign a VLAN 1 IP Address to the Switch Module Using the Onboard Administrator to Assign an IP Address to the Switch Module fa0 Interface Completing the Express Setup Fields Refreshing the PC IP Address Managing the Switch Module Using the Device Manager Command-Line Interface Other Management Options Onboard Administrator Command-Line Interface In Case of Difficulty Troubleshooting Express Setup Resetting the Switch Module Accessing Help Online For More Information Obtaining Documentation Cisco.com Product Documentation DVD Ordering Documentation Documentation Feedback Cisco Product Security Overview Reporting Security Problems in Cisco Products Obtaining Technical Assistance Cisco Technical Support & Documentation Website Submitting a Service Request Definitions of Service Request Severity Obtaining Additional Publications and Information Hardware Warranty Terms Cisco 90-Day Limited Hardware Warranty Terms HP Hardware Warranty Terms Getting Started Guide Cisco Catalyst Blade Switch 3020 for HP Getting Started Guide Training & Events Partner Central Downloads Cisco Catalyst Blade Switch 3020 for HP Getting Started Guide INCLUDING LICENSE AND WARRANTY 1 Introduction This guide provides instructions on how to install your Cisco Catalyst Blade Switch 3020 for HP-hereafter referred to as the switch module-in the HP c-Class BladeSystem and to set up and configure your switch module. The HP c-Class BladeSystem-hereafter referred to as the blade server- supports up to eight Ethernet switch modules, which are installed in the interconnect bays of the blade server. This guide also covers management options and troubleshooting help for the switch module. For details on the numbers, types, and the location of the blade server bays, for additional information on the blade server system, and for detailed port mapping information, see the HP BladeSystem enclosure installation poster or the HP BladeSystem enclosure setup and installation guide at http:// www.hp.com/go/bladesystem/documentation. For additional installation and configuration information about the switch module, see the Cisco Catalyst Blade Switch 3020 for HP documentation on Cisco.com. For system requirements, important notes, limitations, open and resolved caveats, and last-minute documentation updates about the switch module, see the release notes, also on Cisco.com. When using the online publications, refer to the documents that match the Cisco IOS software version that is running on the switch module. See the "Obtaining Documentation" section on page 1-24 for more information about the switch module publications. For translations of the warnings that appear in this publication and all safety and handling warnings for this product, see the Regulatory Compliance and Safety Information for the Cisco Catalyst Blade Switch 3020 for HP that accompanies this guide. Before proceeding, read the release notes for the blade server. The release notes are available on the HP support website at www.support.hp.com. 2 Taking Out What You Need These items ship with your switch module: • Console cable • Cisco Catalyst Blade Switch 3020 for HP Getting Started Guide (this book) • Regulatory Compliance and Safety Information for the Cisco Catalyst Blade Switch 3020 for HP • Registration card Follow these steps: 1. Unpack and remove the switch module and the accessory kit from the shipping box. 2. Return the packing material to the shipping container, and save it for future use. If the switch modules are ordered with the blade server, the switch modules are already installed. The unpacking procedure for the switch module applies only if one is ordered separately. See the blade server documentation for the unpacking procedure for the HP equipment. Cisco Gigabit Ethernet Switch Module Description The Cisco Catalyst Blade Switch 3020 for HP is a 24 Gigabit Ethernet port, Layer 2+ switch module. Sixteen of the Gigabit Ethernet ports are internal 1000BASE-X downlink ports that connect to the blade server. The other eight Gigabit Ethernet ports are external uplink ports that provide connections to other switches or routers. Uplink ports operate at 10/100/1000 Mbps if used as RJ-45 ports and operate at 1000 Mbps if small form-factor pluggable (SFP) fiber-optic modules are installed. See Table 1 for more detailed descriptions of the switch module ports. Figure 1 shows the switch module. http://www.cisco.com/en/US/products/ps6748/products_getting_started_guide09186a00806c38a8.html (1 of 11)4/19/2007 10:27:47 AM
-
 1
1 -
 2
2 -
 3
3 -
 4
4 -
 5
5 -
 6
6 -
 7
7 -
8
-
9
-
10
-
11
 |
 |