HP 6910p HP Compaq notebook common image - Page 11
b Notebook PC. - compaq drivers
 |
UPC - 883585172306
View all HP 6910p manuals
Add to My Manuals
Save this manual to your list of manuals |
Page 11 highlights
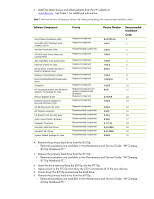
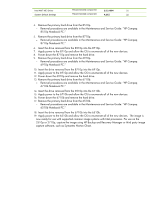
Intel AMT MEI Driver System Default Settings Recommended component 2.5.3.1084 21 Recommended component 4.20 Z 22 4. Remove the primary hard drive from the 8510p. - Removal procedures are available in the Maintenance and Service Guide: "HP Compaq 8510p Notebook PC." 5. Remove the primary hard drive from the 8710p. - Removal procedures are available in the Maintenance and Service Guide: "HP Compaq 8710p Notebook PC." 6. Insert the drive removed from the 8510p into the 8710p. 7. Apply power to the 8710p and allow the OS to enumerate all of the new devices. 8. Power down the 8710p and remove the hard drive. 9. Remove the primary hard drive from the 6910p. - Removal procedures are available in the Maintenance and Service Guide: "HP Compaq 6910p Notebook PC." 10. Insert the drive removed from the 8710p into the 6910p. 11. Apply power to the 6910p and allow the OS to enumerate all of the new devices. 12. Power down the 6910p and remove the hard drive. 13. Remove the primary hard drive from the 6710b. - Removal procedures are available in the Maintenance and Service Guide: "HP Compaq 6710b Notebook PC." 14. Insert the drive removed from the 6910p into the 6710b. 15. Apply power to the 6710b and allow the OS to enumerate all of the new devices. 16. Power down the 6710b and remove the hard drive. 17. Remove the primary hard drive from the 6510b. - Removal procedures are available in the Maintenance and Service Guide: "HP Compaq 6510b Notebook PC." 18. Insert the drive removed from the 6710b into the 6510b. 19. Apply power to the 6510b and allow the OS to enumerate all of the new devices. The image is now ready for use with supported common image systems with Intel processors. For use on the 2510p or 2710p, capture the image using HP Backup and Recovery Manager or third party image capture software, such as Symantec Norton Ghost.
-
 1
1 -
2
-
3
-
4
-
5
-
 6
6 -
 7
7 -
 8
8 -
 9
9 -
 10
10 -
 11
11 -
 12
12 -
 13
13 -
 14
14 -
 15
15
 |
 |