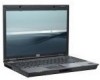
HP 6910p HP Compaq notebook common image - Page 4
Common image preparation using factory preinstalled, Windows Vista images - bios
 |
UPC - 883585172306
View all HP 6910p manuals
Add to My Manuals
Save this manual to your list of manuals |
Page 4 highlights
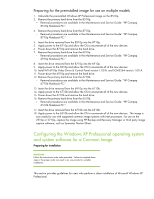
Common image preparation using factory preinstalled Windows Vista images Using the factory preinstall image IMPORTANT Follow the instructions in the order provided. Failure to complete these steps in the proper order can result in an unsuccessful or unstable installation. The factory image can only be shared on the 8710p, 8510p, 6910p, 2710p (Vista Only), 2510p, 6710b and 6510b models. This section provides guidelines for users who use the preinstalled image of Microsoft Windows Vista Business. Preparing for installation 1. If necessary, undock the unit, disconnect all external peripherals and remove all PC card devices. 2. Connect AC power. 3. To check and upgrade ROM BIOS for each system, follow the steps below. - Check the current ROM BIOS using Computer Setup (see Appendix A). - Compare the current ROM version date to the latest ROMPaq release date on the HP website to ensure that you have the most recent version. If you do not have the most recent version, install the latest system ROM BIOS. Note Refer to the online download and installation instructions to complete the ROM upgrade. Preparing for the preinstalled image for use on multiple models 1. Unbundle the preinstalled Windows Vista Business image on the 8510p. - Refer to the documentation included with the system for instructions. 2. Create restore discs using HP Backup and Recovery Manager. 3. Remove the primary hard drive from the 8510p. - Removal procedures are available in the Maintenance and Service Guide: "HP Compaq 8510p Notebook PC." 4. Remove the primary hard drive from the 8510p. - Removal procedures are available in the Maintenance and Service Guide: "HP Compaq 8510p Notebook PC." 5. Insert the drive removed from the 8510p into the 8710p. 6. Apply power to the 8710p and allow the OS to enumerate all of the new devices. 7. Power down the 8710p and remove the hard drive. 8. Remove the primary hard drive from the 6910p. - Removal procedures are available in the Maintenance and Service Guide: "HP Compaq 6910p Notebook PC." 9. Insert the drive removed from the 8710p into the 6910p.
-
 1
1 -
 2
2 -
 3
3 -
 4
4 -
 5
5 -
 6
6 -
 7
7 -
 8
8 -
 9
9 -
 10
10 -
11
-
12
-
13
-
14
-
15
 |
 |