HP 8550 HP Color LaserJet 8550, 8550N, 8550DN, 8550GN, 8550MFP Printer - User - Page 142
Clear Paper Jam, Clear Transfer, Clear Tray 4 Jam, Clear Tray X Jam
 |
View all HP 8550 manuals
Add to My Manuals
Save this manual to your list of manuals |
Page 142 highlights
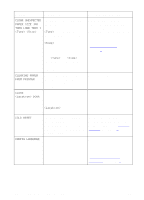
Message Description Recommended Action CLEAR PAPER JAM The printer senses a media jam. Open and shut the front door of the printer to clear any paper from the printer. If the message still appears on the printer, check all areas of the printer for jammed media since the printer is unable to determine the location of the media jam. For more information on clearing jams, see the quick reference guide. CLEAR TRANSFER JAM The printer senses a media jam in the transfer drum area. Open the upper right door. Lift the metal strip with the green corner and remove all of the media. Remove the transfer drum, remove the jammed media, reinstall the transfer drum, close the upper right door, and wait for the printer to warm up before resuming printing. For more information on clearing jams, see the quick reference guide. CLEAR TRAY 4 JAM The printer senses a media jam in tray 4. Open tray 4, remove the jammed media, close tray 4, and wait for the printer to warm up before resuming printing. For more information on clearing jams, see the quick reference guide. CLEAR TRAY X JAM The printer senses a media jam in one of the optional paper trays. Open the indicated tray and remove the jammed media. Close the tray and wait for the printer to warm up before resuming printing. For more information on clearing jams, see the quick reference guide. EN Printer Messages 141
-
 1
1 -
2
-
3
-
4
-
5
-
6
-
7
-
8
-
9
-
10
-
11
-
12
-
13
-
14
-
15
-
16
-
17
-
18
-
19
-
20
-
21
-
22
-
23
-
24
-
25
-
26
-
27
-
28
-
29
-
30
-
31
-
32
-
33
-
34
-
35
-
36
-
37
-
38
-
39
-
40
-
41
-
42
-
43
-
44
-
45
-
46
-
47
-
48
-
49
-
50
-
51
-
52
-
53
-
54
-
55
-
56
-
57
-
58
-
59
-
60
-
61
-
62
-
63
-
64
-
65
-
66
-
67
-
68
-
69
-
70
-
71
-
72
-
73
-
74
-
75
-
76
-
77
-
78
-
79
-
80
-
81
-
82
-
83
-
84
-
85
-
86
-
87
-
88
-
89
-
90
-
91
-
92
-
93
-
94
-
95
-
96
-
97
-
98
-
99
-
100
-
101
-
102
-
103
-
104
-
105
-
106
-
107
-
108
-
109
-
110
-
111
-
112
-
113
-
114
-
115
-
116
-
117
-
118
-
119
-
120
-
121
-
122
-
123
-
124
-
125
-
126
-
127
-
128
-
129
-
130
-
131
-
132
-
133
-
134
-
135
-
136
-
 137
137 -
 138
138 -
 139
139 -
 140
140 -
 141
141 -
 142
142 -
 143
143 -
 144
144 -
 145
145 -
 146
146 -
 147
147 -
148
-
149
-
150
-
151
-
152
-
153
-
154
-
155
-
156
-
157
-
158
-
159
-
160
-
161
-
162
-
163
-
164
-
165
-
166
-
167
-
168
-
169
-
170
-
171
-
172
-
173
-
174
-
175
-
176
-
177
-
178
-
179
-
180
-
181
-
182
-
183
-
184
-
185
-
186
-
187
-
188
-
189
-
190
-
191
-
192
-
193
-
194
-
195
-
196
-
197
-
198
-
199
-
200
-
201
-
202
-
203
-
204
-
205
-
206
-
207
-
208
-
209
-
210
-
211
-
212
-
213
-
214
-
215
-
216
-
217
-
218
-
219
-
220
-
221
-
222
-
223
-
224
-
225
-
226
-
227
-
228
-
229
-
230
-
231
-
232
-
233
-
234
-
235
-
236
-
237
-
238
-
239
-
240
-
241
-
242
 |
 |
