HP 915 Basic Guide - Page 12
Clear paper jams, Print cartridge troubleshooting, Find more information - all in one printer cartridge
 |
View all HP 915 manuals
Add to My Manuals
Save this manual to your list of manuals |
Page 12 highlights
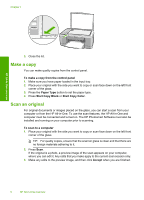
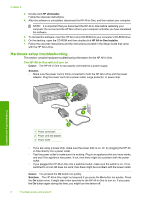
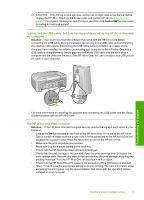
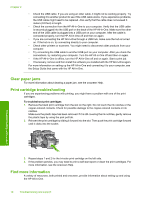
Chapter 2 • Check the USB cable. If you are using an older cable, it might not be working properly. Try connecting it to another product to see if the USB cable works. If you experience problems, the USB cable might need to be replaced. Also verify that the cable does not exceed 3 meters (9.8 feet) in length. • Check the connection from the HP All-in-One to your computer. Verify that the USB cable is securely plugged into the USB port on the back of the HP All-in-One. Make sure the other end of the USB cable is plugged into a USB port on your computer. After the cable is connected properly, turn the HP All-in-One off and then on again. • If you are connecting the HP All-in-One through a USB hub, make sure the hub is turned on. If the hub is on, try connecting directly to your computer. • Check other printers or scanners. You might need to disconnect older products from your computer. • Try connecting the USB cable to another USB port on your computer. After you check the connections, try restarting your computer. Turn the HP All-in-One off and then on again. • If the HP All-in-One is offline, turn the HP All-in-One off and on again. Start a print job. • If necessary, remove and then install the software you installed with the HP All-in-One again. For more information on setting up the HP All-in-One and connecting it to your computer, see the Setup Guide that came with the HP All-in-One. Clear paper jams For more information about clearing a paper jam, see the onscreen Help. Print cartridge troubleshooting If you are experiencing problems with printing, you might have a problem with one of the print cartridges. To troubleshoot print cartridges 1. Remove the black print cartridge from the slot on the right. Do not touch the ink nozzles or the copper-colored contacts. Check for possible damage to the copper-colored contacts or ink nozzles. Make sure the plastic tape has been removed. If it is still covering the ink nozzles, gently remove the plastic tape by using the pink pull tab. 2. Reinsert the print cartridge by sliding it forward into the slot. Then push the print cartridge forward until it clicks into the socket. Troubleshooting and support 3. Repeat steps 1 and 2 for the tri-color print cartridge on the left side. 4. If the problem persists, you may need to print a self-test report or clean the print cartridges. For more information, see the onscreen Help. Find more information A variety of resources, both printed and onscreen, provide information about setting up and using the HP All-in-One. 10 Troubleshooting and support
-
 1
1 -
2
-
3
-
4
-
5
-
6
-
 7
7 -
 8
8 -
 9
9 -
 10
10 -
 11
11 -
 12
12 -
 13
13 -
 14
14 -
 15
15 -
 16
16 -
 17
17 -
18
 |
 |