HP A626 Basics Guide - Page 9
Use the stylus, Printer menus, Stylus storage areas
 |
UPC - 883585085330
View all HP A626 manuals
Add to My Manuals
Save this manual to your list of manuals |
Page 9 highlights
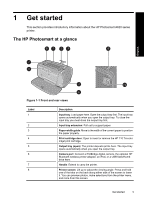
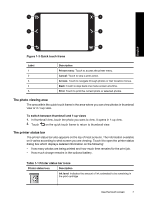
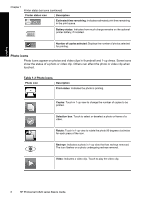
Use the stylus Use the stylus to draw on a photo or to enter a caption for a photo through the touch screen keyboard. For more information, see "Creative projects" on page 15. NOTE: If the printer is set to a language that does not use the roman alphabet, the printer displays the English keyboard. CAUTION: To prevent damage to the touch screen, never use any sharp objects or any device other than the stylus that comes with the printer or an approved replacement. There are two stylus storage areas on the printer: a slot that stores the stylus until you need to use it and a hole where you can rest the stylus and keep it handy. English Figure 1-4 Stylus storage areas Label 1 2 Description Stylus well: Place the stylus here to keep it handy while you work with your photos. Stylus storage slot: Securely store the stylus here when moving the printer or between sessions. Printer menus The printer menus contain many features for printing photos, changing print settings, and more. The menus, when opened, overlay the current photo on the screen. Use the stylus 9
-
 1
1 -
2
-
3
-
 4
4 -
 5
5 -
 6
6 -
 7
7 -
 8
8 -
 9
9 -
 10
10 -
 11
11 -
 12
12 -
 13
13 -
 14
14 -
15
-
16
-
17
-
18
-
19
-
20
-
21
-
22
-
23
-
24
-
25
-
26
-
27
-
28
-
29
-
30
-
31
-
32
-
33
-
34
-
35
-
36
-
37
-
38
-
39
-
40
-
41
-
42
-
43
-
44
-
45
-
46
-
47
-
48
-
49
 |
 |
