HP A7533A Brocade Web Tools Administrator's Guide - Supporting Fabric OS v5.3. - Page 125
Adding and removing members of a zone alias, Renaming zone aliases, Member Selection List
 |
UPC - 829160830858
View all HP A7533A manuals
Add to My Manuals
Save this manual to your list of manuals |
Page 125 highlights
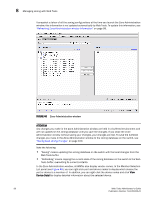
Managing zone aliases 8 ADDING AND REMOVING MEMBERS OF A ZONE ALIAS Use the following procedure to add or remove zone alias members. To modify the members of an alias 1. Open the Zone Administration window as described on page 96. 2. Click the Alias tab. 3. Select the alias you want to modify from the Name drop-down list. 4. Select an element in the Member Selection List that you want to add to the alias, or select an element in the Alias Members list that you want to remove. 5. Click Add Member to add the selected alias member, or click Remove Member to remove the selected alias member. The alias is modified in the Zone Admin buffer. At this point you can either save your changes or save and enable your changes. 6. Click Zoning Actions> Save Config Only to save the configuration changes. To enable the configuration, see "Enabling zone configurations" on page 109. RENAMING ZONE ALIASES Use the following procedure to change the name of a zone alias. To rename a zone alias 1. Open the Zone Administration window as described on page 96. 2. Click the Alias tab and select the alias you want to rename from the Name drop-down list. 3. Click Rename. The Rename an Alias dialog box appears. 4. Type a new alias name and click OK. The alias is renamed in the Zone Admin buffer. At this point you can either save your changes or save and enable your changes. 5. Click Zoning Actions> Save Config Only to save the configuration changes. To enable the configuration, see "Enabling zone configurations" on page 109. DELETING ZONE ALIASES You can remove a zone alias from the Zone Admin buffer. When a zone alias is deleted, it is no longer a member of the zones of which it was once a member. To delete a zone alias 1. Open the Zone Administration window as described on page 96. 2. Click the Alias tab. 3. Select the alias you want to delete from the Name drop-down list. 4. Click Delete. Web Tools Administrator's Guide 103 Publication Number: 53-1000435-01
-
 1
1 -
2
-
3
-
4
-
5
-
6
-
7
-
8
-
9
-
10
-
11
-
12
-
13
-
14
-
15
-
16
-
17
-
18
-
19
-
20
-
21
-
22
-
23
-
24
-
25
-
26
-
27
-
28
-
29
-
30
-
31
-
32
-
33
-
34
-
35
-
36
-
37
-
38
-
39
-
40
-
41
-
42
-
43
-
44
-
45
-
46
-
47
-
48
-
49
-
50
-
51
-
52
-
53
-
54
-
55
-
56
-
57
-
58
-
59
-
60
-
61
-
62
-
63
-
64
-
65
-
66
-
67
-
68
-
69
-
70
-
71
-
72
-
73
-
74
-
75
-
76
-
77
-
78
-
79
-
80
-
81
-
82
-
83
-
84
-
85
-
86
-
87
-
88
-
89
-
90
-
91
-
92
-
93
-
94
-
95
-
96
-
97
-
98
-
99
-
100
-
101
-
102
-
103
-
104
-
105
-
106
-
107
-
108
-
109
-
110
-
111
-
112
-
113
-
114
-
115
-
116
-
117
-
118
-
119
-
 120
120 -
 121
121 -
 122
122 -
 123
123 -
 124
124 -
 125
125 -
 126
126 -
 127
127 -
 128
128 -
 129
129 -
 130
130 -
131
-
132
-
133
-
134
-
135
-
136
-
137
-
138
-
139
-
140
-
141
-
142
-
143
-
144
-
145
-
146
-
147
-
148
-
149
-
150
-
151
-
152
-
153
-
154
-
155
-
156
-
157
-
158
-
159
-
160
-
161
-
162
-
163
-
164
-
165
-
166
-
167
-
168
-
169
-
170
-
171
-
172
-
173
-
174
-
175
-
176
-
177
-
178
-
179
-
180
-
181
-
182
-
183
-
184
-
185
-
186
-
187
-
188
-
189
-
190
-
191
-
192
-
193
-
194
-
195
-
196
-
197
-
198
-
199
-
200
-
201
-
202
-
203
-
204
-
205
-
206
-
207
-
208
-
209
-
210
-
211
-
212
-
213
-
214
-
215
-
216
-
217
-
218
-
219
-
220
-
221
-
222
-
223
-
224
-
225
-
226
-
227
-
228
-
229
-
230
-
231
-
232
-
233
-
234
-
235
-
236
-
237
-
238
-
239
-
240
-
241
-
242
-
243
-
244
-
245
-
246
-
247
-
248
-
249
-
250
-
251
-
252
-
253
-
254
-
255
-
256
-
257
-
258
-
259
-
260
-
261
-
262
-
263
-
264
-
265
-
266
 |
 |