HP C3180A Service Manual - Page 98
Ć34, Removal and Replacement, Remove the electronicsĆenclosure cover
 |
View all HP C3180A manuals
Add to My Manuals
Save this manual to your list of manuals |
Page 98 highlights
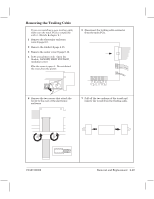
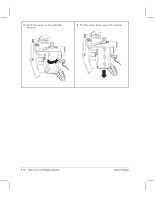
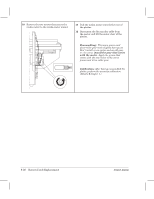
Removing the FrontĆPanel PCA and LED Assembly 1 Remove the electronicsĆenclosure cover D page 6Ć5. 2 Remove the window D page 6Ć15. 3 Remove the center cover D page 6Ć16. 4 Remove the right endcover D page 6Ć19. 5 Remove the frontĆpanel assembly D page 6Ć32. 6 On the underside of the frontĆpanel assembly, press the four transparent plastic tabs inwards and remove the PCA and LED assembly. The frontĆpanel PC and LED assembly (keyboard assembly) is one orderable part, which includes the frontĆpanel keys and the cable. 6Ć34 Removal and Replacement C3187Ć90000
-
 1
1 -
2
-
3
-
4
-
5
-
6
-
7
-
8
-
9
-
10
-
11
-
12
-
13
-
14
-
15
-
16
-
17
-
18
-
19
-
20
-
21
-
22
-
23
-
24
-
25
-
26
-
27
-
28
-
29
-
30
-
31
-
32
-
33
-
34
-
35
-
36
-
37
-
38
-
39
-
40
-
41
-
42
-
43
-
44
-
45
-
46
-
47
-
48
-
49
-
50
-
51
-
52
-
53
-
54
-
55
-
56
-
57
-
58
-
59
-
60
-
61
-
62
-
63
-
64
-
65
-
66
-
67
-
68
-
69
-
70
-
71
-
72
-
73
-
74
-
75
-
76
-
77
-
78
-
79
-
80
-
81
-
82
-
83
-
84
-
85
-
86
-
87
-
88
-
89
-
90
-
91
-
92
-
 93
93 -
 94
94 -
 95
95 -
 96
96 -
 97
97 -
 98
98 -
 99
99 -
 100
100 -
 101
101 -
 102
102 -
 103
103 -
104
-
105
-
106
-
107
-
108
-
109
-
110
-
111
-
112
-
113
-
114
-
115
-
116
-
117
-
118
-
119
-
120
-
121
-
122
-
123
-
124
-
125
-
126
-
127
-
128
-
129
-
130
-
131
-
132
-
133
-
134
-
135
-
136
-
137
-
138
-
139
-
140
-
141
-
142
-
143
-
144
-
145
-
146
-
147
-
148
-
149
-
150
-
151
-
152
-
153
-
154
-
155
-
156
-
157
-
158
-
159
-
160
-
161
-
162
-
163
-
164
-
165
-
166
-
167
-
168
-
169
-
170
-
171
-
172
-
173
-
174
-
175
-
176
-
177
-
178
-
179
-
180
-
181
-
182
-
183
-
184
-
185
-
186
-
187
-
188
-
189
-
190
-
191
-
192
-
193
-
194
-
195
-
196
-
197
-
198
-
199
-
200
-
201
-
202
-
203
-
204
-
205
-
206
-
207
-
208
-
209
-
210
-
211
-
212
-
213
-
214
-
215
-
216
-
217
-
218
-
219
-
220
-
221
-
222
-
223
-
224
-
225
-
226
-
227
-
228
-
229
-
230
-
231
-
232
-
233
-
234
-
235
-
236
-
237
-
238
-
239
-
240
-
241
-
242
-
243
-
244
-
245
-
246
 |
 |

1
Remove the electronicsĆenclosure cover
D
page 6Ć5.
2
Remove the window
D
page 6Ć15.
3
Remove the center cover
D
page 6Ć16.
4
Remove the right endcover
D
page 6Ć19.
5
Remove the frontĆpanel assembly
D
page 6Ć32.
6
On the underside of the frontĆpanel assembly, press the four transparent plastic tabs inwards
and remove the PCA and LED assembly.
The frontĆpanel PC and LED assembly (keyboard assembly) is one orderable part,
which includes the frontĆpanel keys and the cable.
6Ć34
Removal and Replacement
C3187Ć90000
Removing the FrontĆPanel PCA and LED Assembly