HP CB534A User Manual - Page 123
Make an extension telephone available to receive faxes, Block faxes, Add entry, Delete entry
 |
View all HP CB534A manuals
Add to My Manuals
Save this manual to your list of manuals |
Page 123 highlights
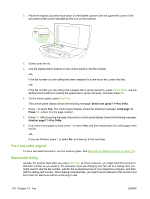
4. Use the arrow buttons to select Block faxes, and then press OK. 5. To block a fax number, use the arrow buttons to select Add entry, and then press OK. Enter the fax number exactly as it appears in the header (including spaces), and then press OK. Enter a name for the blocked number, and then press OK. To unblock a single fax number, use the arrow buttons to select Delete entry, and then press OK. Use the arrow buttons to select the fax number that you want to delete, and then press OK to confirm the deletions. -or- To unblock all blocked fax numbers, use the arrow buttons to select Clear all, and then press OK. Press OK again to confirm the deletions. Make an extension telephone available to receive faxes With this setting turned on, you can alert the product to pick up the incoming fax call by pressing 1-2-3 sequentially on the telephone keypad. The default setting is On. Turn this setting off only if you use pulse dialing or if you have a service from your telephone company that also uses the 1-2-3 sequence. The telephone company service does not work if it conflicts with the product. 1. On the control panel, press Setup ( ). 2. Use the arrow buttons to select Fax setup, and then press OK. 3. Use the arrow buttons to select Fax Recv. setup, and then press OK. 4. Use the arrow buttons to select Extension Phone, and then press OK. 5. Use the arrow buttons to select On or Off, and then press OK to save the selection. ENWW Change fax settings 111
-
 1
1 -
2
-
3
-
4
-
5
-
6
-
7
-
8
-
9
-
10
-
11
-
12
-
13
-
14
-
15
-
16
-
17
-
18
-
19
-
20
-
21
-
22
-
23
-
24
-
25
-
26
-
27
-
28
-
29
-
30
-
31
-
32
-
33
-
34
-
35
-
36
-
37
-
38
-
39
-
40
-
41
-
42
-
43
-
44
-
45
-
46
-
47
-
48
-
49
-
50
-
51
-
52
-
53
-
54
-
55
-
56
-
57
-
58
-
59
-
60
-
61
-
62
-
63
-
64
-
65
-
66
-
67
-
68
-
69
-
70
-
71
-
72
-
73
-
74
-
75
-
76
-
77
-
78
-
79
-
80
-
81
-
82
-
83
-
84
-
85
-
86
-
87
-
88
-
89
-
90
-
91
-
92
-
93
-
94
-
95
-
96
-
97
-
98
-
99
-
100
-
101
-
102
-
103
-
104
-
105
-
106
-
107
-
108
-
109
-
110
-
111
-
112
-
113
-
114
-
115
-
116
-
117
-
 118
118 -
 119
119 -
 120
120 -
 121
121 -
 122
122 -
 123
123 -
 124
124 -
 125
125 -
 126
126 -
 127
127 -
 128
128 -
129
-
130
-
131
-
132
-
133
-
134
-
135
-
136
-
137
-
138
-
139
-
140
-
141
-
142
-
143
-
144
-
145
-
146
-
147
-
148
-
149
-
150
-
151
-
152
-
153
-
154
-
155
-
156
-
157
-
158
-
159
-
160
-
161
-
162
-
163
-
164
-
165
-
166
-
167
-
168
-
169
-
170
-
171
-
172
-
173
-
174
-
175
-
176
-
177
-
178
-
179
-
180
-
181
-
182
-
183
-
184
-
185
-
186
-
187
-
188
-
189
-
190
-
191
-
192
-
193
-
194
-
195
-
196
-
197
-
198
-
199
-
200
-
201
-
202
-
203
-
204
-
205
-
206
-
207
-
208
-
209
-
210
-
211
-
212
-
213
-
214
-
215
-
216
-
217
-
218
-
219
-
220
-
221
-
222
-
223
-
224
-
225
-
226
-
227
-
228
-
229
-
230
-
231
-
232
-
233
-
234
-
235
-
236
-
237
-
238
-
239
-
240
-
241
-
242
-
243
-
244
-
245
-
246
-
247
-
248
-
249
-
250
-
251
-
252
-
253
-
254
 |
 |
