HP CC470A HP Color LaserJet CP3525 Series Printers - User Guide - Page 192
Replace <color> Cartridge, Replace Fuser Kit
 |
View all HP CC470A manuals
Add to My Manuals
Save this manual to your list of manuals |
Page 192 highlights
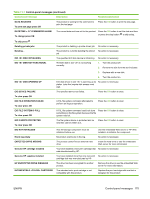
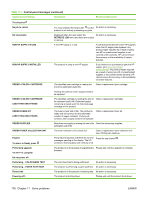
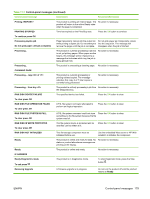
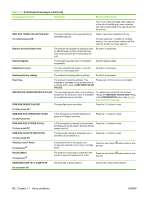
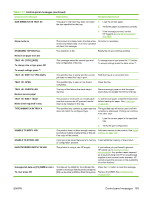
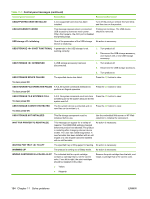
Table 11-1 Control-panel messages (continued) Control panel message Description Recommended action Remove all print cartridges To exit press The product is testing the transfer unit assembly. To perform the test, remove all the print cartridges. To cancel the test, press the stop button . Remove at least one print cartridge To exit press The product is testing the print-cartridge motor. To perform the test, remove at least one print cartridge. To cancel the test, press the stop button . REPLACE CARTRIDGE The product indicates when a supply level is at its estimated end of life. The actual life remaining might be different than the estimation. Have a replacement supply available to install when print quality is no longer acceptable. The supply does not need to be replaced now unless the print quality is no longer acceptable. After an HP supply has reached its approximated end of life, HP's premium Protection Warranty on that supply ends. You can configure the product to continue printing by using the REPLACE SUPPLIES menu. For more information about the REPLACE SUPPLIES menu, see System setup menu on page 27. Replace the specified color cartridge. Change print cartridges on page 143 Or, configure the product to continue printing by using the REPLACE SUPPLIES menu. For more information about the REPLACE SUPPLIES menu, see System setup menu on page 27. REPLACE FUSER KIT The fuser is nearing the end of its useful life. CAUTION: The fuser can be hot while the Printing can continue. product is in use. Wait for the fuser to cool before handling it. 1. Open the right door. 2. Grasp the blue handles on both sides of the fuser and pull straight out to remove it. 3. Install the new fuser. 4. Close the right door. REPLACE FUSER KIT To continue press OK The REPLACE SUPPLIES menu is set to the CAUTION: The fuser can be hot while the STOP AT LOW setting. The fuser kit has product is in use. Wait for the fuser to cool reached the low threshold. before handling it. Press the OK button to continue printing until the fuser reaches the end of life, or replace the fuser now. Replace the fuser 1. Open the right door. 2. Grasp the blue handles on each side of the fuser, and pull it straight out to remove it. 3. Install the new fuser. 4. Close the right door. REPLACE SUPPLIES For status press OK Two or more supplies are at the estimated end of life. The actual life remaining might be different than the estimation. Have a replacement supply available to install when print quality is no longer acceptable. The supply does not need to be replaced now Press the OK button to see which supplies need to be replaced. Or, configure the product to continue printing by using the REPLACE SUPPLIES menu. For more information about the REPLACE 180 Chapter 11 Solve problems ENWW
-
 1
1 -
2
-
3
-
4
-
5
-
6
-
7
-
8
-
9
-
10
-
11
-
12
-
13
-
14
-
15
-
16
-
17
-
18
-
19
-
20
-
21
-
22
-
23
-
24
-
25
-
26
-
27
-
28
-
29
-
30
-
31
-
32
-
33
-
34
-
35
-
36
-
37
-
38
-
39
-
40
-
41
-
42
-
43
-
44
-
45
-
46
-
47
-
48
-
49
-
50
-
51
-
52
-
53
-
54
-
55
-
56
-
57
-
58
-
59
-
60
-
61
-
62
-
63
-
64
-
65
-
66
-
67
-
68
-
69
-
70
-
71
-
72
-
73
-
74
-
75
-
76
-
77
-
78
-
79
-
80
-
81
-
82
-
83
-
84
-
85
-
86
-
87
-
88
-
89
-
90
-
91
-
92
-
93
-
94
-
95
-
96
-
97
-
98
-
99
-
100
-
101
-
102
-
103
-
104
-
105
-
106
-
107
-
108
-
109
-
110
-
111
-
112
-
113
-
114
-
115
-
116
-
117
-
118
-
119
-
120
-
121
-
122
-
123
-
124
-
125
-
126
-
127
-
128
-
129
-
130
-
131
-
132
-
133
-
134
-
135
-
136
-
137
-
138
-
139
-
140
-
141
-
142
-
143
-
144
-
145
-
146
-
147
-
148
-
149
-
150
-
151
-
152
-
153
-
154
-
155
-
156
-
157
-
158
-
159
-
160
-
161
-
162
-
163
-
164
-
165
-
166
-
167
-
168
-
169
-
170
-
171
-
172
-
173
-
174
-
175
-
176
-
177
-
178
-
179
-
180
-
181
-
182
-
183
-
184
-
185
-
186
-
 187
187 -
 188
188 -
 189
189 -
 190
190 -
 191
191 -
 192
192 -
 193
193 -
 194
194 -
 195
195 -
 196
196 -
 197
197 -
198
-
199
-
200
-
201
-
202
-
203
-
204
-
205
-
206
-
207
-
208
-
209
-
210
-
211
-
212
-
213
-
214
-
215
-
216
-
217
-
218
-
219
-
220
-
221
-
222
-
223
-
224
-
225
-
226
-
227
-
228
-
229
-
230
-
231
-
232
-
233
-
234
-
235
-
236
-
237
-
238
-
239
-
240
-
241
-
242
-
243
-
244
-
245
-
246
-
247
-
248
-
249
-
250
-
251
-
252
-
253
-
254
-
255
-
256
-
257
-
258
-
259
-
260
-
261
-
262
-
263
-
264
 |
 |