HP Cc3310 Installation Instructions: HP Universal Rack Mount Kit - HP Carrier- - Page 6
Post Installation Instructions
 |
View all HP Cc3310 manuals
Add to My Manuals
Save this manual to your list of manuals |
Page 6 highlights
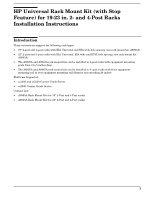
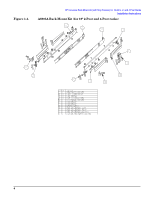
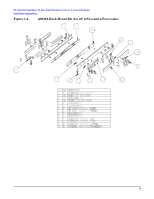
HP Universal Rack Mount Kit (with Stop Feature) for 19-23 in. 2- and 4-Post Racks Installation Instructions 4-Post Installation Instructions Install the rack mount kit components as follows: NOTE Although a cc3300 chassis is shown in the illustrations, these instructions also apply to a cc3310 and cc2300 chassis. 1. Attach the two inner rails (marked LEFT and RIGHT) to the chassis, each with three 8-32x1/4" SEMS screws. 2. Attach the universal front mounting bracket to the chassis, each with two 8-32x1/4" SEMS screws. Figure 1-3. Installing the Inner Rails and Front End Mounting Brackets NOTE The universal front mounting bracket can be flipped in order to position the system further forward in the rack (see inset). 6
-
 1
1 -
 2
2 -
 3
3 -
 4
4 -
 5
5 -
 6
6 -
 7
7 -
 8
8 -
 9
9 -
 10
10 -
 11
11 -
 12
12 -
13
-
14
-
15
-
16
 |
 |

HP Universal Rack Mount Kit (with Stop Feature) for 19-23 in. 2- and 4-Post Racks
Installation Instructions
6
4-Post Installation Instructions
Install the rack mount kit components as follows:
NOTE
Although a cc3300 chassis is shown in the illustrations, these instructions also apply to a
cc3310 and cc2300 chassis.
1.
Attach the two inner rails (marked LEFT and RIGHT) to the chassis, each with three 8-32x1/4" SEMS
screws.
2.
Attach the universal front mounting bracket to the chassis, each with two 8-32x1/4" SEMS screws.
Figure 1-3.
Installing the Inner Rails and Front End Mounting Brackets
NOTE
The universal front mounting bracket can be flipped in order to position the system further
forward in the rack (see inset).