HP Cisco MDS 9216i Cisco Nexus 5000 Series Hardware Installation Guide (OL-159 - Page 65
Removing and Installing Power Supplies, Removing a Power Supply
 |
View all HP Cisco MDS 9216i manuals
Add to My Manuals
Save this manual to your list of manuals |
Page 65 highlights
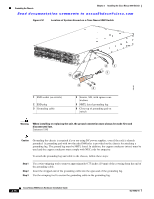
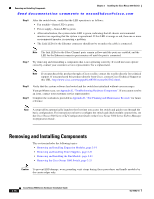
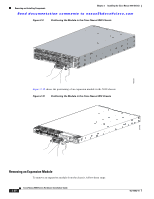
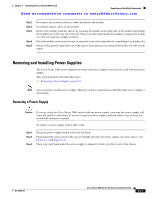
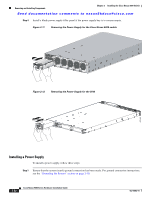
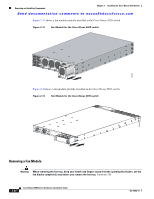
Chapter 2 Installing the Cisco Nexus 5000 Switch Removing and Installing Components Send documentation comments to [email protected] Step 1 Step 2 Step 3 Step 4 Step 5 Disconnect any network interface cables attached to the module. Loosen the captive screw on the module. Remove the module from the chassis by grasping the handle on the right side of the module and sliding the module part of the way out of the slot. Place your other hand under the module to support the weight of it. Do not touch the module circuitry. Place the module on an antistatic mat or antistatic foam if not immediately reinstalling it in another slot. Install a filler panel to keep dust out of the chassis and maintain consistent airflow if the slot will remain empty. Removing and Installing Power Supplies The Cisco Nexus 5000 switch supports two front-end power supplies, but it may be used with one power supply. This section includes the following topics: • Removing a Power Supply, page 2-21 Note You can replace a faulty power supply while the system is operating provided the other power supply is functioning. Removing a Power Supply Caution If you are using the Cisco Nexus 5000 switch with one power supply, removing the power supply will cause the switch to shut down. If you are using two power supplies and you remove one of them, the switch will continue to operate. To remove a power supply, follow these steps: Step 1 Step 2 Step 3 Grasp the power supply handle with your left hand. Push against the release latch with your left thumb and slide the power supply out of the chassis. See Figure 2-11 and Figure 2-12. Place your right hand under the power supply to support it while you slide it out of the chassis. OL-15902-01 Cisco Nexus 5000 Series Hardware Installation Guide 2-21
-
 1
1 -
2
-
3
-
4
-
5
-
6
-
7
-
8
-
9
-
10
-
11
-
12
-
13
-
14
-
15
-
16
-
17
-
18
-
19
-
20
-
21
-
22
-
23
-
24
-
25
-
26
-
27
-
28
-
29
-
30
-
31
-
32
-
33
-
34
-
35
-
36
-
37
-
38
-
39
-
40
-
41
-
42
-
43
-
44
-
45
-
46
-
47
-
48
-
49
-
50
-
51
-
52
-
53
-
54
-
55
-
56
-
57
-
58
-
59
-
 60
60 -
 61
61 -
 62
62 -
 63
63 -
 64
64 -
 65
65 -
 66
66 -
 67
67 -
 68
68 -
 69
69 -
 70
70 -
71
-
72
-
73
-
74
-
75
-
76
-
77
-
78
-
79
-
80
-
81
-
82
-
83
-
84
-
85
-
86
-
87
-
88
-
89
-
90
-
91
-
92
-
93
-
94
-
95
-
96
-
97
-
98
-
99
-
100
-
101
-
102
-
103
-
104
-
105
-
106
-
107
-
108
-
109
-
110
-
111
-
112
 |
 |
