HP Cluster Platform Hardware Kits v2010 HP ProLiant DL16x Server Cable Managem - Page 11
Installing the 3.5 Inch Straps, Attaching the 3.5 Inch Strap
 |
View all HP Cluster Platform Hardware Kits v2010 manuals
Add to My Manuals
Save this manual to your list of manuals |
Page 11 highlights
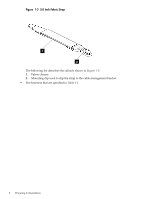
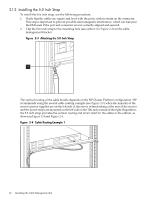
2. Ensure that the cable management bracket's strap mounting face is lined up with the PCI slot as shown in Figure 2-1. The strap mounting face radius' should face downward so as not to damage the InfiniBand cables. 3. Fasten the cable management bracket to the rack's rear rails by removing both of the top rail kit mounting screws. Fasten the cable management bracket to the rear rail with the two 10-32 screws provided in the cable management bracket installation kit. It will not be necessary to use the clip nuts that came with this kit because the top mounting hole already provides a threaded insert. Discard the clip nuts that came with this kit and use the threaded insert that is already in place for the rail kit assembly. Fasten the screws to the recommended torque listed in Table 1-1 (page 9). Note: If you are installing the cable management bracket to support cables from ProLiant DL160 G5 and DL165 G5 servers, you do not need to use the clip nuts provided in this kit. However, future applications of this bracket may require use of the clip nuts. 2.1.1 Installing the 3.5 Inch Straps To attach the 3.5 inch straps to the cable management bracket, use the following procedure: 1. Position one of the 3.5 inch straps on the cable management bracket's mounting face, as shown in Figure 2-2, so that it is approximately adjacent to the PCI ports in the rear of the ProLiant DL16x server. Figure 2-2 Attaching the 3.5 Inch Strap 1 3 2 2. Clip an M6 cage nut into the top of the bracket's slot, as shown by callout 1. 3. Insert an M6 x 16-mm screw through the metal grommet in the strap, as shown by callout 2. 4. Use a #2 (medium) Phillips screwdriver to secure the strap loosely. 5. Rotate the strap (callout 3) and move it horizontally in the elongated slot to align it with the center of the ProLiant DL16x PCI port. 6. Using a sample cable, align the strap so that the cable's connector (plug) is aligned correctly with the PCI port. 7. Repeat steps 1-6 to install the second 3.5-inch strap, when needed. 8. After aligning the straps, tighten the screws to their specified torque. 2.1 Installing the Cable Management Bracket 11
-
 1
1 -
2
-
3
-
4
-
5
-
 6
6 -
 7
7 -
 8
8 -
 9
9 -
 10
10 -
 11
11 -
 12
12 -
 13
13 -
 14
14
 |
 |
