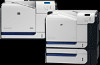
HP Color LaserJet CP3520 HP Color LaserJet CP3525 Series Printers - Software T - Page 49
Update Now, Device Settings, Start, Control Panel, Hardware and Sound, Printers, Settings
 |
View all HP Color LaserJet CP3520 manuals
Add to My Manuals
Save this manual to your list of manuals |
Page 49 highlights
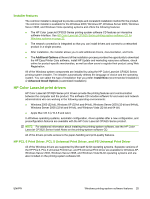
Table 2-3 EAC availability in Novell Netware environments Method Connection type Novell Netware 4.x Netware 5.x Bindery queue NDS queue Bindery queue USB Network Jetdirect TCP/IP x x x IPX/SPX Standard TCP/IP (HP) TCP/IP (MS1) IPX/SPX (HP) 1 Bidirectional functionality is supported only with the client software from Novell. It is not supported with Microsoft Client Service for NetWare. Update Now If you have modified the configuration of the HP Color LaserJet CP3525 Series product since installation, the driver can be automatically updated with the new configuration in environments that support bidirectional communication. Use the Update Now feature to automatically reflect the new configuration in the driver. For example, if the product is installed and an optional paper-handling accessory is added later, use the Update Now feature to query the product and update the settings to match the new product configuration. The feature automatically updates the registry and changes the configuration information that appears on the Device Settings tab. NOTE: Depending on which settings were updated, the Update Now feature might change the configuration information that displays on the print-driver tabs, instead of (or in addition to) changing the information on the Device Settings tab. NOTE: The Update Now feature is not supported in environments where shared Windows 2000 or Windows XP clients are connected to Windows 2000 or Windows XP hosts. To activate the Update Now feature, follow these steps: 1. In Windows Vista, click the Start button, click Control Panel, click Hardware and Sound, and then click Printers. In Windows XP, Windows Server 2003, and Windows Server 2008, click Start, click Settings, and then click Printers and Faxes. In Windows 2000, click Start, click Settings, and then click Printers. 2. Right-click the product name. 3. Click Properties. 4. Click Device Settings. 5. If necessary, click Installable Options to expand it and show the options. ENWW Driver Configuration for Windows 29
-
 1
1 -
2
-
3
-
4
-
5
-
6
-
7
-
8
-
9
-
10
-
11
-
12
-
13
-
14
-
15
-
16
-
17
-
18
-
19
-
20
-
21
-
22
-
23
-
24
-
25
-
26
-
27
-
28
-
29
-
30
-
31
-
32
-
33
-
34
-
35
-
36
-
37
-
38
-
39
-
40
-
41
-
42
-
43
-
 44
44 -
 45
45 -
 46
46 -
 47
47 -
 48
48 -
 49
49 -
 50
50 -
 51
51 -
 52
52 -
 53
53 -
 54
54 -
55
-
56
-
57
-
58
-
59
-
60
-
61
-
62
-
63
-
64
-
65
-
66
-
67
-
68
-
69
-
70
-
71
-
72
-
73
-
74
-
75
-
76
-
77
-
78
-
79
-
80
-
81
-
82
-
83
-
84
-
85
-
86
-
87
-
88
-
89
-
90
-
91
-
92
-
93
-
94
-
95
-
96
-
97
-
98
-
99
-
100
-
101
-
102
-
103
-
104
-
105
-
106
-
107
-
108
-
109
-
110
-
111
-
112
-
113
-
114
-
115
-
116
-
117
-
118
-
119
-
120
-
121
-
122
-
123
-
124
-
125
-
126
-
127
-
128
-
129
-
130
-
131
-
132
-
133
-
134
-
135
-
136
-
137
-
138
-
139
-
140
-
141
-
142
-
143
-
144
-
145
-
146
-
147
-
148
-
149
-
150
-
151
-
152
-
153
-
154
-
155
-
156
-
157
-
158
-
159
-
160
-
161
-
162
-
163
-
164
-
165
-
166
-
167
-
168
-
169
-
170
-
171
-
172
-
173
-
174
-
175
-
176
-
177
-
178
-
179
-
180
-
181
-
182
-
183
-
184
-
185
-
186
-
187
-
188
-
189
-
190
-
191
-
192
-
193
-
194
-
195
-
196
-
197
-
198
-
199
-
200
-
201
-
202
-
203
-
204
-
205
-
206
-
207
-
208
-
209
-
210
-
211
-
212
-
213
-
214
-
215
-
216
-
217
-
218
-
219
-
220
-
221
-
222
-
223
-
224
-
225
-
226
-
227
-
228
-
229
-
230
-
231
-
232
-
233
-
234
-
235
-
236
-
237
-
238
-
239
-
240
-
241
-
242
-
243
-
244
-
245
-
246
-
247
-
248
-
249
-
250
-
251
-
252
-
253
-
254
-
255
-
256
-
257
-
258
-
259
-
260
-
261
-
262
-
263
-
264
-
265
-
266
-
267
-
268
-
269
-
270
-
271
-
272
-
273
-
274
-
275
-
276
-
277
-
278
-
279
-
280
-
281
-
282
-
283
-
284
-
285
-
286
-
287
-
288
-
289
-
290
-
291
-
292
-
293
-
294
-
295
-
296
-
297
-
298
-
299
-
300
-
301
-
302
-
303
-
304
-
305
-
306
-
307
-
308
-
309
-
310
-
311
-
312
-
313
-
314
-
315
-
316
-
317
-
318
-
319
-
320
-
321
-
322
-
323
-
324
-
325
-
326
-
327
-
328
-
329
-
330
 |
 |
