HP Color LaserJet Enterprise MFP M682 Fax Guide - Page 17
General fax send settings, Administration, Fax Settings
 |
View all HP Color LaserJet Enterprise MFP M682 manuals
Add to My Manuals
Save this manual to your list of manuals |
Page 17 highlights
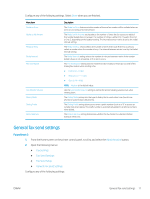
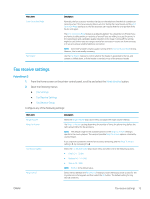
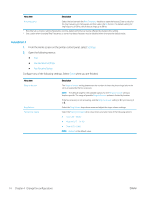
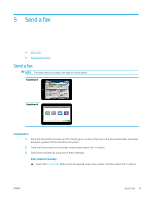
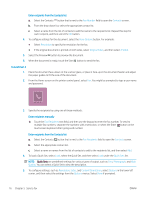
Configure any of the following settings. Select Done when you are finished. Menu item Redial on Error Redial on No Answer Redial on Busy Redial Interval Fax Send Speed Line Monitor Volume Dialing Mode Dialing Prefix Detect dial tone Description The Redial on Error feature sets the number of times a fax number will be redialed when an error occurs during a fax transmission. The Redial on No Answer setting selects the number of times the fax accessory redials if the number dialed does not answer. The number of retries is either 0 to 1 (used in the U.S.) or 0 to 2, depending on the location setting. The interval between retries is set by the redial interval setting. The Redial on Busy setting selects the number of times (0 through 9) the fax accessory redials a number when the number is busy. The interval between retries is set by the Redial Interval setting. The Redial Interval setting selects the number of minutes between retries if the number dialed is busy or not answering, or if an error occurs. The Fax Send Speed setting sets the modem bit rate (measured in bits per second) of the Analog Fax modem while sending a fax. ● Fast (v.34 - 33.6k) ● Medium (v.17 - 14.4k) ● Slow (v.29 - 9.6k) NOTE: Medium is the default value. Use the Line Monitor Volume setting to control the printer's dialing volume level when sending faxes. The Dialing Mode setting sets the type of dialing that is used: either tone (touch-tone phones) or pulse (rotary-dial phones). The Dialing Prefix setting allows you to enter a prefix number (such as a "9" to access an outside line) when dialing. This prefix number is automatically added to all phone numbers when dialed. The Detect dial tone setting determines whether the fax checks for a dial tone before dialing to send a fax. General fax send settings FutureSmart 3 1. From the Home screen on the printer control panel, scroll to and select the Administration button. 2. Open the following menus: ● Fax Settings ● Fax Send Settings ● Fax Send Setup ● General Fax Send Settings Configure any of the following settings: ENWW General fax send settings 11
-
 1
1 -
2
-
3
-
4
-
5
-
6
-
7
-
8
-
9
-
10
-
11
-
 12
12 -
 13
13 -
 14
14 -
 15
15 -
 16
16 -
 17
17 -
 18
18 -
 19
19 -
 20
20 -
 21
21 -
 22
22 -
23
-
24
-
25
-
26
-
27
-
28
-
29
-
30
-
31
-
32
-
33
-
34
-
35
-
36
 |
 |