HP Color LaserJet Managed MFP E78223-E78228 Engine Install Guide - Page 2
Install the printer on the DCF, or the cabinet stand.
 |
View all HP Color LaserJet Managed MFP E78223-E78228 manuals
Add to My Manuals
Save this manual to your list of manuals |
Page 2 highlights
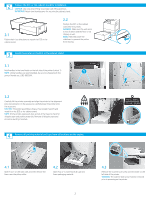
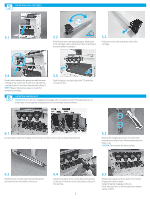
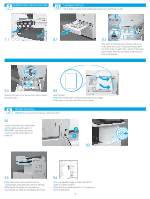
2 Prepare the DCF, or the cabinet stand for installation. CAUTION: Use care when lifting. Use proper safe lifting practices. IMPORTANT: Retain two thumbscrews for securing the cabinet stand. 2.1 Follow the in-box directions to unpack the DCF, or the cabinet stand. 2.2 Position the DCF, or the cabinet stand near the printer. WARNING: Make sure the work area is free of debris and the floor is not slippery or wet. NOTE: If desired, lower the stabilizers to prevent the printer from moving. 3 Install the printer on the DCF, or the cabinet stand. 3.1 Hold handles in the hand holds on the left side of the printer (callout 1). NOTE: Lifting handles are recommended, but are not shipped with the 1 printer (handle set: JC82-00538A). 3.2 Carefully lift the printer assembly and align the printer to the alignment pins and connector on the accessory. Carefully lower the printer onto the accessory. CAUTION: The printer assembly is heavy. Four people must lift and install it on the DCF, or the cabinet stand. NOTE: On the printer, open each door and all of the trays to check for shipping tape and packing materials. Remove all shipping tape and protective packing materials. 4 Remove all packing material and tape from all locations on the engine. 2 77.7 kg - 82.9 kg 171.3 lb - 182.8 lb 4.1 Open Tray 1 on the right side, and then remove the foam near the pickup roller. 4.2 Open Tray 2-3 and remove all tape and foam packaging material. 2 4.3 Remove the scanner lock screw and red sticker on the left side of the printer. WARNING: The scanner lock screw must be removed prior to powering on the printer.
-
 1
1 -
 2
2 -
 3
3 -
 4
4 -
 5
5 -
 6
6 -
 7
7
 |
 |
