HP Color LaserJet Professional CP5220 HP Color LaserJet Professional CP5220 Se - Page 114
Jam locations, Change Jam Recovery setting, System, System Setup, Jam Recovery
 |
View all HP Color LaserJet Professional CP5220 manuals
Add to My Manuals
Save this manual to your list of manuals |
Page 114 highlights
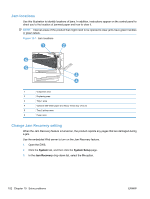
Jam locations Use this illustration to identify locations of jams. In addition, instructions appear on the control panel to direct you to the location of jammed paper and how to clear it. NOTE: Internal areas of the product that might need to be opened to clear jams have green handles or green labels. Figure 10-1 Jam locations 1 2 6 5 3 4 1 Output-bin area 2 Duplexing area 3 Tray 1 area 4 Optional 500-sheet paper and heavy media tray (Tray 3) 5 Tray 2 pickup area 6 Fuser area Change Jam Recovery setting When the Jam Recovery feature is turned on, the product reprints any pages that are damaged during a jam. Use the embedded Web server to turn on the Jam Recovery feature. 1. Open the EWS. 2. Click the System tab, and then click the System Setup page. 3. In the Jam Recovery drop-down list, select the On option. 102 Chapter 10 Solve problems ENWW
-
 1
1 -
2
-
3
-
4
-
5
-
6
-
7
-
8
-
9
-
10
-
11
-
12
-
13
-
14
-
15
-
16
-
17
-
18
-
19
-
20
-
21
-
22
-
23
-
24
-
25
-
26
-
27
-
28
-
29
-
30
-
31
-
32
-
33
-
34
-
35
-
36
-
37
-
38
-
39
-
40
-
41
-
42
-
43
-
44
-
45
-
46
-
47
-
48
-
49
-
50
-
51
-
52
-
53
-
54
-
55
-
56
-
57
-
58
-
59
-
60
-
61
-
62
-
63
-
64
-
65
-
66
-
67
-
68
-
69
-
70
-
71
-
72
-
73
-
74
-
75
-
76
-
77
-
78
-
79
-
80
-
81
-
82
-
83
-
84
-
85
-
86
-
87
-
88
-
89
-
90
-
91
-
92
-
93
-
94
-
95
-
96
-
97
-
98
-
99
-
100
-
101
-
102
-
103
-
104
-
105
-
106
-
107
-
108
-
 109
109 -
 110
110 -
 111
111 -
 112
112 -
 113
113 -
 114
114 -
 115
115 -
 116
116 -
 117
117 -
 118
118 -
 119
119 -
120
-
121
-
122
-
123
-
124
-
125
-
126
-
127
-
128
-
129
-
130
-
131
-
132
-
133
-
134
-
135
-
136
-
137
-
138
-
139
-
140
-
141
-
142
-
143
-
144
-
145
-
146
-
147
-
148
-
149
-
150
-
151
-
152
-
153
-
154
-
155
-
156
-
157
-
158
-
159
-
160
-
161
-
162
-
163
-
164
-
165
-
166
-
167
-
168
 |
 |
