HP DeskJet Ink Advantage 5640 User Guide - Page 84
Print & Scan, Print Diagnostic Information
 |
View all HP DeskJet Ink Advantage 5640 manuals
Add to My Manuals
Save this manual to your list of manuals |
Page 84 highlights
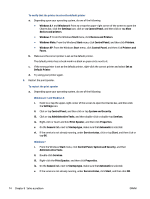
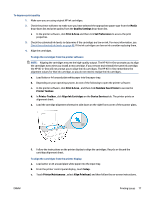
5. Print a diagnostics page if the cartridges are not low on ink. To print a diagnostics page from the printer software a. Load letter or A4 unused plain white paper into the paper tray. b. Depending on your operating system, do one of the following to open the printer software: c. In the printer software, click Print & Scan , and then click Maintain Your Printer to access the printer toolbox. d. Click Print Diagnostic Information on the Device Reports tab to print a diagnostics page. Review the blue, magenta, yellow, and black boxes on the diagnostics page. If you are seeing streaks in the color and black boxes, or no ink in portions of the boxes, then automatically clean the cartridges. To print a diagnostics page from the printer display a. Load letter or A4 unused plain white paper into the paper tray. b. From the printer control panel, touch Setup . c. Touch Reports . d. Touch Print Quality Report. 6. Clean the ink cartridges automatically, if the diagnostic page shows steaks or missing portions of the color and black boxes. To clean the cartridges from the printer software a. Load letter or A4 unused plain white paper into the paper tray. b. Depending on your operating system, do one of the following to open the printer software: ● Windows 8.1: Click the down arrow in lower left corner of the Start screen, and then select the printer name. ● Windows 8: Right-click an empty area on the Start screen, click All Apps on the app bar, and then select the printer name. ● Windows 7, Windows Vista, and Windows XP: From the computer desktop, click Start, select All Programs, click HP, click the folder for the printer, and then select the icon with the printer's name. c. In the printer software, click Print & Scan and then click Maintain Your Printer to access the Printer Toolbox. d. Click Clean Ink Cartridges on the Device Services tab. Follow the on-screen instructions. To clean the cartridges from the printer display a. Load Letter or A4 unused plain white paper into the input tray. b. From the printer control panel display, touch Setup . c. Touch Printer Maintenance , select Clean Printhead, and then follow the on-screen instructions. If cleaning the printhead does not solve the problem, contact HP support. Go to www.hp.com/support . This website provides information and utilities that can help you correct many common printer 78 Chapter 8 Solve a problem ENWW
-
 1
1 -
2
-
3
-
4
-
5
-
6
-
7
-
8
-
9
-
10
-
11
-
12
-
13
-
14
-
15
-
16
-
17
-
18
-
19
-
20
-
21
-
22
-
23
-
24
-
25
-
26
-
27
-
28
-
29
-
30
-
31
-
32
-
33
-
34
-
35
-
36
-
37
-
38
-
39
-
40
-
41
-
42
-
43
-
44
-
45
-
46
-
47
-
48
-
49
-
50
-
51
-
52
-
53
-
54
-
55
-
56
-
57
-
58
-
59
-
60
-
61
-
62
-
63
-
64
-
65
-
66
-
67
-
68
-
69
-
70
-
71
-
72
-
73
-
74
-
75
-
76
-
77
-
78
-
 79
79 -
 80
80 -
 81
81 -
 82
82 -
 83
83 -
 84
84 -
 85
85 -
 86
86 -
 87
87 -
 88
88 -
 89
89 -
90
-
91
-
92
-
93
-
94
-
95
-
96
-
97
-
98
-
99
-
100
-
101
-
102
-
103
-
104
-
105
-
106
-
107
-
108
-
109
-
110
-
111
-
112
-
113
-
114
-
115
-
116
-
117
-
118
-
119
-
120
-
121
-
122
-
123
-
124
-
125
-
126
-
127
-
128
-
129
-
130
-
131
-
132
-
133
-
134
-
135
-
136
 |
 |
