HP DeskJet Ink Advantage Ultra 5730 Getting Started Guide - Page 14
Set up fax
 |
View all HP DeskJet Ink Advantage Ultra 5730 manuals
Add to My Manuals
Save this manual to your list of manuals |
Page 14 highlights
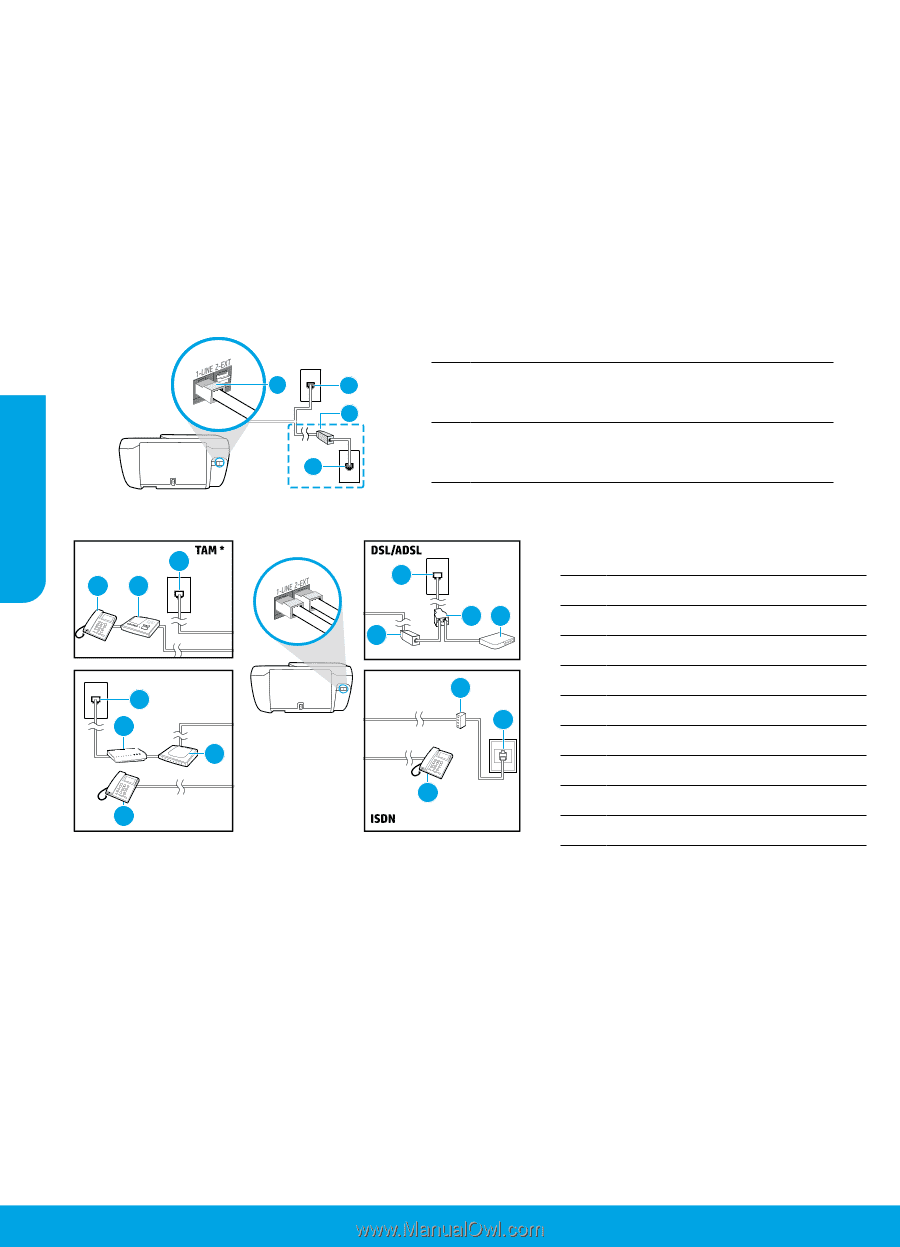
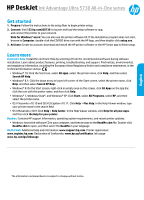
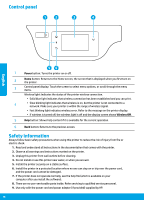
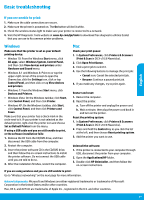
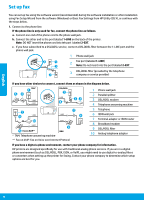
English Set up fax You can set up fax using the software wizard (recommended) during the software installation or after installation using Fax Setup Wizard from the software (Windows) or Basic Fax Settings from HP Utility (OS X), or continue with the steps below. 1. Connect to the phone line. If the phone line is only used for fax, connect the phone line as follows. a. Connect one end of the phone cord to the phone wall jack. b. Connect the other end to the port labeled 1-LINE on the back of the printer. Note: DO NOT insert the phone cord into teh port labeled 2-EXT. c. If you have subscribed to a DSL/ADSL service, connect a DSL/ADSL filter between the 1-LINE port and the phone wall jack. 2 1 1-LINE 3 1 1 Phone wall jack 2 Fax port (labeled 1-LINE) Note: Do not insert into the port labeled 2-EXT. 3 DSL/ADSL filter (provided by the telephone company or service provider) If you have other devices to connect, connect them as shown in the diagram below. 1 54 1-LINE 2-EXT 1 1-LINE 9 23 1 8 1-LINE 1-LINE 7 6 10 2-EXT 2-EXT 5 5 Fax on VoIP** * TAM: Telephone answering machine ** Fax on VoIP: Fax on Voice over Internet Protocol 1 Phone wall jack 2 Parallel splitter 3 DSL/ADSL modem 4 Telephone answering machine 5 Telephone 6 ISDN wall jack 7 Terminal adapter or ISDN router 8 Broadband modem 9 DSL/ADSL filter 10 Analog telephone adaptor If you have a digital a phone environment, contact your phone company for information. HP printers are designed specifically for use with traditional analog phone services. If you are in a digital phone environment (such as DSL/ADSL, PBX, ISDN, or VoIP), you might need to use digital-to-analog filters or converters when setting up the printer for faxing. Contact your phone company to determine which setup options are best for you. 14
-
 1
1 -
2
-
3
-
4
-
5
-
6
-
7
-
8
-
 9
9 -
 10
10 -
 11
11 -
 12
12 -
 13
13 -
 14
14 -
 15
15 -
 16
16
 |
 |