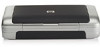
HP Deskjet 460 HP Mobile Printer Toolbox for Personal Digital Assistants (PDAs - Page 10
Configuring and using 802.11 wireless profiles - driver
 |
View all HP Deskjet 460 manuals
Add to My Manuals
Save this manual to your list of manuals |
Page 10 highlights
Configuring and using 802.11 wireless profiles Each profile you configure in the software (1, 2, and 3) corresponds to a wireless profile switch position (1, 2, and 3) on the printer. The current profile is the current position (1, 2, or 3) of the wireless profile switch. With the wireless profile switch on the printer, you can store settings for up to three 802.11 computers or networks. This allows you to easily move the printer from home to office or between any three wireless network environments. When you install the printer driver from the Starter CD and select Wireless for the connection type, the 802.11 wireless profile settings are stored in the current position of the wireless profile switch. Once you have installed the software using a wireless connection, you can configure the three wireless profile settings to match the wireless networks you want to use. To configure 802.11 wireless profiles 1. Open the Toolbox. (See Opening the Toolbox.) 2. On the Services (Palm OS) or Printer Services (Pocket PC) tab, tap Wireless Settings. 3. Tap the profile that you want to configure. 4. Configure the desired settings, such as the wireless network name (SSID), the communication mode, the channel, the type of authentication used, and the type of encryption used. For more information about 802.11 wireless settings, see the onscreen user's guide for the printer. 5. Tap OK to save the settings. NOTE: When new 802.11 settings are sent to the printer to configure one of the wireless profiles, the printer will turn off and then back on again (power cycle) to enable the settings. To print on a specific profile 1. Move the wireless profile switch on the printer to the profile that matches the wireless network you want to use. 2. Print a document using the installed printer driver. 8 Connecting to the printer
-
 1
1 -
2
-
3
-
4
-
 5
5 -
 6
6 -
 7
7 -
 8
8 -
 9
9 -
 10
10 -
 11
11 -
 12
12 -
 13
13 -
 14
14 -
 15
15 -
16
-
17
-
18
-
19
-
20
-
21
-
22
-
23
-
24
 |
 |
