HP ENVY dv4-5b00 HP Envy dv4 Maintenance and Service Guide - Page 44
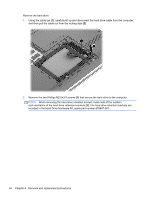
Optical drive, Remove the Phillips M2.5×7.0 screw
 |
View all HP ENVY dv4-5b00 manuals
Add to My Manuals
Save this manual to your list of manuals |
Page 44 highlights
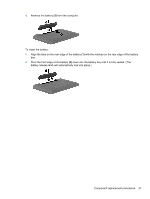
Optical drive Description DVD±RW Double-Layer SuperMulti optical drive (includes bezel and bracket) Optical Drive Hardware Kit (includes optical drive bezel, optical drive bracket, and optical drive connector cable) Spare part number 676661-001 681227-001 Before removing the optical drive, follow these steps: 1. Shut down the computer. 2. Disconnect the power from the computer by unplugging the power cord from the computer. 3. Disconnect all external devices from the computer. 4. Remove the battery (see Battery on page 30). 5. Remove the service door (see Service door on page 32). Remove the optical drive: 1. Remove the Phillips M2.5×7.0 screw (1) that secures the optical drive to the computer. 2. Use a flat-blade screw driver or similar tool to press on the optical drive bracket tab (2) to release the optical drive. 3. Remove the optical drive (3) from the computer. 4. If it is necessary to replace the optical drive bezel, use a thin tool or an unbent paper clip to release the optical drive tray (1). 36 Chapter 4 Removal and replacement procedures
-
 1
1 -
2
-
3
-
4
-
5
-
6
-
7
-
8
-
9
-
10
-
11
-
12
-
13
-
14
-
15
-
16
-
17
-
18
-
19
-
20
-
21
-
22
-
23
-
24
-
25
-
26
-
27
-
28
-
29
-
30
-
31
-
32
-
33
-
34
-
35
-
36
-
37
-
38
-
 39
39 -
 40
40 -
 41
41 -
 42
42 -
 43
43 -
 44
44 -
 45
45 -
 46
46 -
 47
47 -
 48
48 -
 49
49 -
50
-
51
-
52
-
53
-
54
-
55
-
56
-
57
-
58
-
59
-
60
-
61
-
62
-
63
-
64
-
65
-
66
-
67
-
68
-
69
-
70
-
71
-
72
-
73
-
74
-
75
-
76
-
77
-
78
-
79
-
80
-
81
-
82
-
83
-
84
-
85
-
86
-
87
-
88
-
89
-
90
-
91
-
92
-
93
-
94
-
95
-
96
 |
 |
