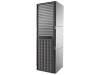
HP EVA P6550 HP Controller Enclosure Cache DIMM Replacement Instructions (5697 - Page 3
Removing a DIMM, CAUTION, Removing a controller, Location of controller DIMMs
 |
View all HP EVA P6550 manuals
Add to My Manuals
Save this manual to your list of manuals |
Page 3 highlights
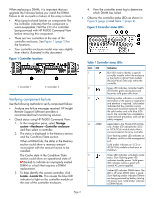
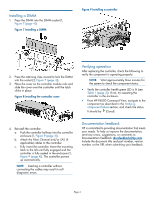
Removing a DIMM CAUTION: Verify the location of the controller being serviced. Removing the wrong controller can result in data loss. 1. Halt I/O to the controller with HP P6000 Command View: a. In the navigation pane, select Storage System→Hardware→Controller Enclosure. b. Select the appropriate controller (Controller 1 or Controller 2) to halt. c. Click the Shut down tab. d. In the Halt Controller section of the Shut Down Controller window, click Halt. This halts controller processing while the power remains on. 2. Disconnect the Fibre Channel and/or SAS (if applicable) cables from the halted controller. Ensure they are marked to facilitate reconnecting later. 3. Remove the controller: a. Move the mounting latch to the right (1, Figure 3 (page 3)). The controller will slightly eject from the enclosure. b. Position one hand under the controller, and with the other hand, pull the controller out of the enclosure (2, Figure 3 (page 3)). Figure 3 Removing a controller Figure 4 Removing the controller cover 5. Figure 5 (page 3) shows the location of the two DIMMs on the controller. Figure 5 Location of controller DIMMs 1. Slot 1 (policy memory) 2. Slot 2 (cache memory) 6. Press the retaining clips outward to unlock the DIMM socket (1, Figure 6 (page 3)). This action releases the module and partially lifts the module out of the socket. Figure 6 Removing a DIMM 4. Push the blue button on top of the controller module (1, Figure 4 (page 3)) and slide off the cover (2). 7. Lift out the DIMM (2, Figure 6 (page 3)). Page 3
-
 1
1 -
 2
2 -
 3
3 -
 4
4
 |
 |
