HP EVA P6550 HP Controller Enclosure Cache DIMM Replacement Instructions (5697 - Page 4
Installing a DIMM, Verifying operation, From HP P6000 Command View, navigate to
 |
View all HP EVA P6550 manuals
Add to My Manuals
Save this manual to your list of manuals |
Page 4 highlights
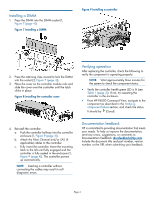
Installing a DIMM 1. Press the DIMM into the DIMM socket (1, Figure 7 (page 4)). Figure 7 Installing a DIMM Figure 9 Installing a controller 2. Press the retaining clips inward to lock the DIMM into the socket (2, Figure 7 (page 4)). 3. Place the cover on the controller module rails and slide the cover over the controller until the latch clicks in place. Figure 8 Installing the controller cover Verifying operation After replacing the controller, check the following to verify the component is operating properly: NOTE: Wait approximately three minutes for the system to check the component status. • Verify the controller health green LED is lit (see Table 1 (page 2)). If not, try reseating the controller in the enclosure. • From HP P6000 Command View, navigate to the component as described in the Verifying component failure section, and check the status. It should be (Good). 4. Reinstall the controller: a. Push the controller halfway into the controller enclosure (1, Figure 9 (page 4)). b. Attach the Fibre Channel and/or SAS (if applicable) cables to the controller. c. Fully insert the controller. Move the mounting latch to the left until fully engaged and the controller is fully seated in the enclosure (2, Figure 9 (page 4)). The controller powers up automatically. NOTE: Inserting a controller without connecting the cables may result in soft diagnostic errors. Documentation feedback HP is committed to providing documentation that meets your needs. To help us improve the documentation, send any errors, suggestions, or comments to Documentation Feedback ([email protected]). Include the document title and part number, version number, or the URL when submitting your feedback. Page 4
-
 1
1 -
 2
2 -
 3
3 -
 4
4
 |
 |
