HP EVA P6550 HP EVA Updating Product Software Guide (xcs10001000) (5697-2423, - Page 33
Verifying installation on the management module
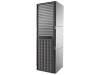 |
View all HP EVA P6550 manuals
Add to My Manuals
Save this manual to your list of manuals |
Page 33 highlights
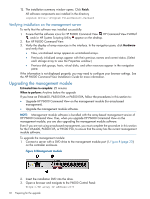
NOTE: • If you are running a version of management module software earlier than 0001.1000 (which corresponds to XCS 09004000 or earlier), use port 2372. • If you have not previously set the IP address for the management module, the default is 192.168.0.1. • If you have not previously completed the initial setup for the management module, see "Connecting to the management module (initial setup)" in the HP P6000 Control Panel User Guide. The P6000 Control Panel login window appears. 4. Log in as an HP EVA administrator (user name admin and the password). The P6000 Control Panel GUI appears. 5. In the navigation pane, select Update management module firmware. The Update Management Module Firmware window opens. 6. Click Browse and browse to the installation DVD. 7. Select the ABM.pkg file and click Next step. 8. Follow the online instructions and click Finish. A confirmation window opens. 9. Click OK. The Management Module Restart in Progress window opens. The image files are loaded. This step can take several minutes. IMPORTANT: The management module will restart upon completion of the update. Allow up to 15 minutes to re-establish a browser connection. Do not reseat, restart, or reset the management module during this time if you are unable to reconnect from your browser. After the management module restarts, it may exhibit slow response time for about 5 to 10 minutes while gathering array information and completing background processes. Upon completion of the upgrade and restart, one of the following occurs: • The P6000 Control Panel login window opens. Continue with "Verifying installation on the management module" (page 33). • The P6000 Control Panel login window fails to open, which occurs if you are using the default IP address (192.168.0.1) for the management module. Continue with Step 10. 10. Press the reset button (2, Figure 8 (page 32)) on the management module to activate the IP address. Upon reset, the P6000 Control Panel login window opens. Continue with "Verifying installation on the management module" (page 33). Verifying installation on the management module To verify that the management module software was upgraded successfully: 1. On the P6000 Control Panel login window, log in as an HP EVA administrator (user name admin and the password). NOTE: If set before the upgrade, the password is maintained during the upgrade process. The P6000 Control Panel GUI appears. 2. Click View detailed system information and verify the operation state, XCS version, and management module software version. Upgrading the management module 33
-
 1
1 -
2
-
3
-
4
-
5
-
6
-
7
-
8
-
9
-
10
-
11
-
12
-
13
-
14
-
15
-
16
-
17
-
18
-
19
-
20
-
21
-
22
-
23
-
24
-
25
-
26
-
27
-
 28
28 -
 29
29 -
 30
30 -
 31
31 -
 32
32 -
 33
33 -
 34
34 -
 35
35 -
 36
36 -
 37
37 -
 38
38 -
39
-
40
-
41
-
42
-
43
-
44
-
45
-
46
-
47
-
48
-
49
-
50
-
51
-
52
-
53
-
54
-
55
-
56
-
57
-
58
-
59
-
60
-
61
-
62
-
63
-
64
-
65
-
66
-
67
-
68
-
69
-
70
-
71
-
72
-
73
-
74
-
75
 |
 |
